 OS/2 initially developed in cooperation between Microsoft and IBM back in the 1980s had a turbulent history over the years. By 1996 with the final retail release of OS/2 Warp 4.0, IBM conceded defeat by Microsoft realising it was not able to compete with Windows 95, although still managed to withhold a portion of the enterprise market. Years later it was still found on some servers and even ATMs on the street.
OS/2 Warp 4.52 was the final version by IBM released in 2001 with official support ending in 2006. It wasn’t offered in a retail package, but for those who had a contractual agreement with IBM for OS/2 support. After this the foundation of the OS had evolved into what is now known as eComStation.
In this guide I’ll be using Oracle VirtualBox 5.1.18 on a Windows 10 machine. Unlike previous posts with installing earlier Windows in VirtualBox, there’s no need to retrieve additional drivers.
For this guide you’ll need to have:
- Oracle VirtualBox installed
- CDs or ISO images of IBM OS/2 Warp 4.52 (there’s a Boot CD, and a Client CD)
Setting Up the Virtual Machine
Open up VirtualBox and select New. A Create Virtual Machine dialog box will appear allowing you to select which operating system it will be using for this virtual machine (VM). Give the VM a name and select IBM OS/2 under Type, and OS/2 Warp 4.5 under Version.
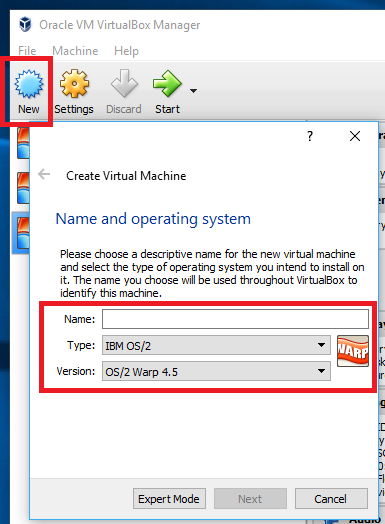
Setting up a new OS/2 virtual machine.
VirtualBox suggests 128 MB of RAM, and a 2 GB virtual hard disk which are both acceptable. I decided to use 256 MB of RAM with a 4.3 GB hard disk. This version of OS/2 requires a minimum of 120 MB, though with all features installed can exceed up to 450 MB of disk space.
Once the VM has been created, very little requires adjusting. Hardware virtualisation features are to be left on (i.e. VT-x/AMD-V), SoundBlaster 16 for sound, and PCNET-Fast III for the network. All I changed is NAT to Bridged Adapter under the Network settings.
Before starting up the VM, I mount the OS/2 Boot CD from selecting the CD-ROM drive under the Storage settings.
As you can see, there’s not a lot to it!
Installing OS/2 Warp 4.52
With the Boot CD mounted, start the VM. As the name suggests the VM boots off the CD and you’ll see OS/2 Warp appear across the screen with a blue background – same as the image at the top of this post. Before long, you’ll be prompted to insert the Client CD. Swap the CDs over and press Enter.

After Setup begins, you’ll be shortly prompted for the Client CD to continue.
You’ll find yourself pressing Enter repeatedly over the next few screens. Press Enter at the welcome screen, press Enter at the installation process screen, press Enter at the minimum volume size, press Enter for the warning about modifying volumes, and press Enter once again that the volume needs to be at least 120 MB in size. Finally you can now actually start creating the volume as per the below screen.

Setting up the hard disk.
At the moment the only recognised volume is the Client CD mounted assigned to a drive letter greater than C. Pressing F5 to change to the Physical View allows you to see the hard disk with its available capacity. Here however you can only change the disk name. Press F5 again to revert back to the Logical View. Press Enter in Logical View and a blue menu will appear. With the default option Create a new volume selected, press Enter for a sub-menu to appear. Select the option Create a volume that can be made bootable and press Enter. You will be asked to specify the assigned drive letter, select C: and press Enter. Next you will need to specify a name for the volume so call it whatever you desire and press Enter.
The Volume Management Tool changes to Physical View stating to choose the disk to create the volume on. Press Enter to continue. Press Enter with D1 highlighted as we only have a single virtual disk. Select Allocate from free space from the menu that appears, and again with the specified free space shown. Next you may name the partition with the default value being [ A ]. Finally you may choose the size of the partition in megabytes, in this case the value is 4400 which will consume the entire hard disk. Press Enter after you’re decided on the partition size or accept the default value.

Specifying the hard disk partition size.
Once done, you’ll return back to the Logical View and you’ll now see a hard disk volume beside the CD-ROM. If you press Enter here you’ll be able to modify the volume and/or hide it from OS/2. However instead press F3, select Save the changes and exit, and press Enter.
A dialog box will appear stating that the disk partitioning is complete. At this point re-mount the Boot CD and invoke the Ctrl+Alt+Del command for the VM to restart it.
You’ll need to repeat the steps of changing back to the Client CD, and go past the welcome and installation process screens. This time Setup prompts to install on the detected volume. Either press A or Enter with Accept this volume selected. It will then be requested to either perform a long or quick format. Given the hard disk is virtual, either press Q or Enter with Perform a quick format selected.
Depending on the volume size specified earlier will determine the next step of selecting the file system. If the volume size was up to 2 GB, you’re given the choice of selecting FAT or OS/2’s HPFS (High Performance File System). As I chose a volume over 4 GB, only HPFS is available. Either way press H or Enter with High Performance File System selected.
In next to no time, the hard disk is formatted and files begin to install. The GUI portion of Setup will start from here on.

You’ll be greeted with configuration settings entering the GUI portion of installation.
Choose the country and keyboard settings relevant to you. The Primary Display defaults to SVGA so no change is needed. Of course, IBM’s standards were listed to choose from even CGA! Under Multimedia Device Support we will specify the sound card. From the dialog box that appears, find down the list Sound Blaster 16 PnP and select Add which will place the selection under Device(s) in System to be Installed. Select OK. Back in the System Configuration dialog box select Next to continue.
Another selection of options are available relating to hardware, though aren’t applicable in a VM environment. PCMCIA and UltraBay device swapping are only specific to IBM ThinkPad laptops for instance. Select Next.
Setup will confirm the printer, though leave the option as Do not install default printer and select OK. Even though we had left SVGA as the display option just before, Setup appears to want to double-check again. Leave the option highlighted for Generic VESA Unaccelerated & VGA GRADDs and select OK.
As shown below, several options can be selected to customise the installation. As I hadn’t chosen a printer, the remaining options have been selected by default. Unless you’re adamant to remove one of these, select Next.

Installation options.
Setup will mention that the next stage of installation is relating to client components. Select Next. After entering your name, four options appear for installation – File and Print Sharing Services, TCP/IP Services, Netscape Communicator, and Tivoli Management Agent. With the exception of Tivoli, the other three are selected by default. Select Next.
Now is when we configure networking where to the left several sections are shown. I’ll mention just the ones that require changing:
File and Print Sharing Services
- Workstation name > The host name (e.g. OS2-VBOX).
- Domain name > Workgroup/domain name, IBMPEERS is default though I changed it to WORKGROUP to match my Windows computers.
User ID and Password
- Type in a user ID and password to be used for the administrator account.
TCP/IP Services
- Select DHCP Server is available on the LAN for your home’s router to automatically assign an IP address to the VM.
Network Adapters and Protocol Services
- First remove the TCP/IP and NetBIOS protocols in order to remove the IBM Ethernet adapter chosen by default.
- As soon as you’ve removed the adapter, a dialog box appears to choose another. Select the AMD PCNet Ethernet Family Adapter and select OK.
- Select Add Protocol and choose TCP/IP. Setup believes it’s not totally configured without NetBIOS, so I added this for the sake of it as well.
Select Install and then OK to confirm completion of the remaining portion of installation. For me it took about five minutes or so with a couple of reboots during the process. Eventually you’ll be asked if you wish to install Java, the OS/2 Developer’s Toolkit, and/or the Multimedia Flash Player however these are totally optional. I chose to install the toolkit, which is sourced from the Boot CD.
By this stage OS/2 Warp is finally installed!

OS/2 Warp 4.52’s desktop immediately after installation.
Improving the Display
OS/2 as is doesn’t look too bad, though you’ll likely want to increase the resolution.
Along the taskbar at the bottom of the screen there’s a red toolbox icon towards the right. Left-click on this and select System from the popup menu. By default OS/2 was set to 640 x 480 with 256 colours, so we’ll change it to 1,024 x 768 with 24-bit colour. If you wish to go higher than that resolution select the plus symbol on the upper right hand side where it states the page number. The second page allows to specify the monitor type. As a safe bet, you may choose the LCD options where 1,280 x 1,024 and 1,600 x 1,280 resolutions are available. These are directly below KFC models in this list which makes me think about eating fried chicken. There’s no OK or Apply button here, so it’s a matter of closing the window by selecting the first box with the diagonal line across it along the title bar.

Changing the display settings.
To restart the VM for the changes to take affect, click on the button on the taskbar that looks like a computer with a red cross on it. OS/2 will ask for confirmation, select Yes. Unlike Windows there’s no specific menu options to shut down, restart, etc. The desktop will disappear and a message is displayed to either turn off the computer, or restart by pressing Ctrl+Alt+Del. Restart the VM at this point.
OS/2 Software
Having chosen the sound and network drivers during installation, that should mean both are functioning okay. Using Netscape you should be able to access the Internet albeit typical of old web browsers won’t be of much use. I was attempting to find information about connecting to a Windows network share, though it appears to rely on using the NetBIOS protocol on both OS/2 and Windows machines.
VirtualBox as you may know comes with Guest Additions to enhance the functionality between the guest OS (what’s being virtualised) and the host OS (your computer’s OS). While available for OS/2, it has limited functions, requires manual installation, and is still only a beta release. Personally I don’t feel it will see any further development, and really doesn’t hinder the experience of using OS/2 by not using it.
Despite the decline of OS/2 into the early 2000s, some software development still occurred over the decade. Mozilla Firefox for instance supported the OS up until version 38.8 Beta 7 in Q2 2016. Gimp and Scribus also have an OS/2 version available, however these and others tend to require various runtime files to work.
To assist, below are some links for some software to make the most of using OS/2 in your VM. These installed with minimal effort.

Lotus SmartSuite 1.7 for OS/2.

Lotus SmartSuite 1.7 – What was once a competitor to Microsoft Office, was eventually acquired by IBM. An update file is included on the ISO. (165 MB)
WarpIn 1.0.19 – A utility that allows you to open WPI files commonly used for software distribution. (1.4 MB)
Adobe Acrobat Reader 3.0 – The last version of Acrobat Reader released for OS/2. (4 MB)
For many accustomed to Windows, OS/2 takes a bit getting used to. Navigating and handling files for instance I felt was rather cumbersome and not necessarily intuitive. As typical with software that’s been touched by IBM, it’s built purely for a purpose and doesn’t have that refinement as Microsoft’s or Apple’s operating systems. Although mainstream society mostly ignored OS/2 in general, it did receive a small but dedicated following yearning for an alternative.

Thanks for this. Very nice. My only regret is that you didn’t do installation of the Guest Additions. It has totally defeated me!
LikeLike
Did you have trouble with installing the Guest Additions as a whole or a specific part of it? Also thanks for the feedback.
LikeLike
With the whole I’m sure. I burned the .iso to CD and in Drives D the files were found (dir) but the command they give “VBoxGuestAdditions-x86 [and -amd64] /extract /D=C:\Drivers” cannot find the files. This has to be used because “Insert….” doesn’t work for OS/2.
LikeLike
Great Article! I want to share an OS/2 warp installation and update manual. I hope you like this. So please Visit:- http://www.elstel.org/OS2Warp/InstallUpdate.html
LikeLike
Amazing work on this, thanks!
All the best,
Samuel
LikeLiked by 1 person
Sadly it didn’t work for me. After the adding ‘Network Adapters and Protocol Services’ step, OS/2 reboots but gives me a distorted display and eventually crashes.

LikeLike
Turns out I had allocated too much RAM and video memory, lol! Decreased those and it worked.
LikeLiked by 1 person
Great stuff! The only change I would make is, if you want to have network share support, you can choose IBM OS/2 NETBIOS OVER TCP/IP instead of just plan IBM OS/2 NETBIOS
LikeLike
Awesome article!! In these pandemic days, it was great getting to meet again this youth friend of mine. 🙂
LikeLike
Thankyou for the reminder on the network card config. I used OS/2 up until the early 2000s, starting with OS/2 2.1 and going through 4.5. Now back in .4.52CP2, just a little newer than where I left off at. Off to get Win/OS2 setup.
LikeLike
I made the mistake of allocating too much video memory (128MB), leading to repeated C0000005 errors on startup. Backing down to 32MB allowed it to complete installation and startup.
LikeLike