Installing DOS and Windows 3.x is relatively straightforward, though configuring both to perform the best they can can be a little more tricky. For this guide I’m using Oracle VirtualBox 5.1.4 (the latest at the time) on a Windows 10 machine. VirtualBox isn’t my first preference for emulation, however it’s free to obtain.

Windows 3.1 wasn’t technically an operating system in itself, though common perception is that it was. Unlike newer versions, Windows up to version 3.x would typically sit on top of some variation of DOS such as MS-DOS or PC-DOS which was the operating system.
For this guide you’ll need to have:
- Oracle VirtualBox installed
- Disk images of MS-DOS 6.22
- Disk images of Windows 3.1
- ET4000 SVGA video driver SVGA Drivers.zip*
- SoundBlaster 16 sound driver Creative Labs SoundBlaster 16.zip*
- CD-ROM driver
- Microsoft Network Client 3.0 for MS-DOS Microsoft Network Client 3.0 for MS-DOS.zip^
- AMD PCNET network driver AMD PCNET Network Drivers.zip*
* Source file from FileRing under the ‘Drivers’ page.
^ Source file from FileRing under the ‘OS Add-ons & Updates’ page.
Setting Up the Virtual Machine
Open up VirtualBox and select New. A Create Virtual Machine dialog box will appear allowing you to select which operating system it will be using for this virtual machine (VM). You may either select the Windows version as shown below, or type Windows 3.1 and the drop-down selection will automatically change. After this, select Next.

Setting up a new Windows 3.1 virtual machine.
The following option now is to choose the amount of RAM. By default as Windows 3.1 had been selected, the recommended memory size is 32 MB. DOS and Windows 3.1 will happily run on the lowest option of 4 MB, though anything above 32 MB is considered overkill. For this, we will leave it as is. Select Next.
Now the option is regarding a hard disk for the VM. As we don’t have one yet, we will select the Create a virtual hard disk now option and choose Create. Again as we’ve chosen Windows 3.1, VirtualBox has suggested the recommended size of the hard disk to be 1 GB. This is plenty. Alternatively you may select Do not add a virtual hard disk and create a hard disk to the desired size after the VM had been created. Later in the wizard there’s also opportunity to change the size anyway.
When creating a new hard disk VirtualBox provides three choices on the file type that is to be used for storing the data within. For this we will just leave it on the default option which is VDI (VirtualBox Disk Image). Nevertheless there’s no wrong option here and largely depends on whether it will be ever used with a different emulator. Select Next.
Continuing with the hard disk VirtualBox allows you to select either a dynamically allocated or fixed size hard disk file. Again there’s no real wrong option here, they both have their pros and cons. For the purposes of this VM, choosing Dynamically allocated will be sufficient. Select Next.
Finally the last option is to choose where the hard disk file is to be saved, and the size of it. For a combination of DOS and Windows 3.1, the size can be as low as 40 MB however there won’t be anything really left for virtual memory and installing applications. Anything above 2 GB and DOS won’t want to know about it as it’s a limitation of the original FAT file system. For a few apps and games a 550 MB disk size is comfortable but that’s up to you. Select Create. The wizard completes and you’ll see Windows 3.1 as an option that is currently ‘powered off’.

Choosing the hard disk size – between 100 MB and 2 GB will be fine.
The VM has now been created. Hitting Settings allows greater control of the ‘hardware’ configuration of the VM. Under Settings, I made the following adjustments:
- System > Acceleration tab > Deactivate the VT-x/AMD-V and Nested Paging
- Display > Scale Factor > Default is 100%, useful for enlarging low resolution output on our modern resolution displays if desired
- Audio > Audio Controller > Use SoundBlaster 16
- Network > Adapter 1 > Use Bridged Adapter and ensure it’s a PCNET-Fast III
- USB > Deactivate the USB controller (shown below)

Removing USB from the virtual machine.
Once settings have been looked at, click the Start button on VirtualBox’s toolbar. A window pops up attempting to boot the VM. Obviously it doesn’t get far as we haven’t installed any software yet. Down the bottom right corner is a row of icons that represent the components of the VM and whether it’s active or not. Right-click on the icon that represents the floppy disk and select Choose disk image. Find the image file of the first DOS install disk and select Open. The floppy disk icon now appears in colour.

Time to install DOS.
Installing MS-DOS
The VM still won’t do anything, so select Machine and then Reset. Alternatively pressing the right Ctrl key with R will do the same thing. VirtualBox may ask you if you are sure you want to reset the VM as you may lose anything not saved. Select Reset. The VM will restart in the same manner as hitting the reset button on your computer. As the floppy disk image has been loaded, it will successfully boot up and automatically start the MS-DOS 6.22 Setup program. Once Setup has loaded, press Enter.

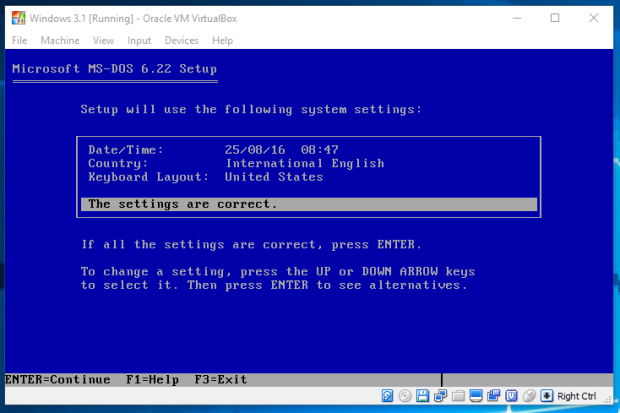
As the hard disk file we created earlier hasn’t been formatted, Setup detects the drive and notes this needs to be done. Choose the Configure unallocated disk space (recommended) option and press Enter. Setup will wish to restart the VM so press Enter again leaving the floppy disk image as is. The VM will restart, Setup comes up again and a quick hard disk format will be performed. On physical hardware this was much slower, however this should be done rather quickly. Once done, Setup will ask about basic regional settings to be used. As I’m not American or live in the USA, I choose the International English option as my country. One you’ve reviewed, press Enter with The settings are correct as the highlighted option.
Setup will then ask you where you wish DOS to be installed. The default is C:\DOS. Press Enter. It now begins to copy files to the hard disk. Normally Setup would take several minutes to complete with a real floppy drive, however as it’s accessing these from disk images it should copy files almost instantaneously. Once Setup asks for the remaining floppy disks choose the disk image file the same way as the first disk before. When all the files have been copies, the below should appear.
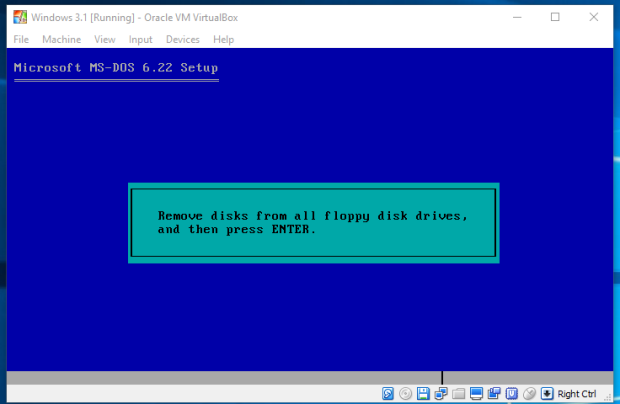
Right-click on the floppy disk icon and select Remove disk from virtual drive. Then press Enter for Setup once done. Setup will inform you that DOS has been installed. Press Enter and the VM will now restart. The hard disk file is now bootable and you’ll reach the DOS prompt awaiting further commands.

You’ve got DOS!
Installing Windows 3.1
At this point, the VM could become just a MS-DOS 6.22 VM for use, however we’ll now continue by installing Windows 3.1.
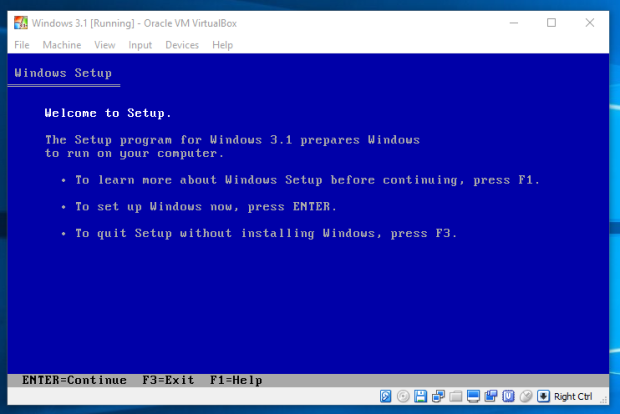
First insert the first disk image for Windows 3.1. At the C:\> prompt, type a:\setup and press Enter. Ensure you don’t type setup at the C:\> prompt as it will attempt to run DOS Setup instead. The Windows 3.1 Setup program should appear. Press Enter to continue.
The following screen will ask if you wish to complete an Express or Custom installation. The Express installation requires less effort and will install Windows using default options. Custom installation allows a finer degree of control. Below are snippets from Setup itself outlining specifically the differences. We’ll use the Express option.


By the time the second floppy disk is used, the GUI portion of Setup appears and you can now begin to use the mouse. It begins by asking for your name. Once you select Continue Setup will re-confirm what you’ve entered is correct. After confirmation you’ll be asked for Disk 3.

When Setup reaches and completes copying files from Disk 6, you are given the option to install a printer. Leave the default option No Printer Attached selected and select Install. Again as it’s being installed on a VM it won’t be shown for long, but Windows’ Program Manager will quickly appear with all the application icons being generated. Setup will ask if you wish to setup icons for mostly DOS applications for ease of access within Program Manager. As only DOS was installed previously, only a small number would be created such as for MS-DOS Editor. Once using Windows, the applications added here will come up under the Applications program group.

The final phase before Windows Setup is complete is to offer a tutorial on both using the mouse and the basics with Windows 3.1. The tutorials can be skipped, though feel free to check them out. At the time of release, a fair portion of computers didn’t necessarily have a mouse and using one wasn’t entirely second nature. Thanks to Windows 3.1, I’m certain sales of mice would have increased significantly and by the time Windows 95 was released the mouse tutorial was dropped.

The Windows tutorials.
After the tutorials were done or skipped over, you’ll be ask to restart your computer or return to the DOS prompt. Remove the floppy disk image loaded, and choose Reboot so that the changes made by Windows Setup to the configuration files such as with AUTOEXEC.BAT and CONFIG.SYS can take affect. After the VM has restarted, type win at the C:\> prompt as mentioned at the end of Windows Setup to start Windows 3.1 for the first time.

Windows Setup is now complete.
Windows 3.1 will load in next to no time and you’ll be greeted with Program Manager on a dull grey background. As we chose the Express installation, Windows Setup loads up the default VGA video driver. Due to this, the resolution is limited to 640 x 480 pixels utilising only 16 colours. Windows won’t also by default detect your sound, CD/DVD drive, or network card either and therefore these need to be configured manually with the relevant software drivers. But hey, you can still play a round of Solitaire!

Windows 3.1’s desktop in VGA mode.
Improving Windows Visually
Using Windows with only 16 colours isn’t much fun, so we’ll go through the steps to improve that. VirtualBox uses VESA based video and can be finicky with video drivers for older operating systems. I’ll be using Super VGA (SVGA) drivers I obtained somewhere on the internet to improve the video output to 1024 x 768 resolution at 256 colours.
While 256 colours may not sound like much, for most Windows 3.x era applications this was totally acceptable. Much software had VGA as the minimum requirement, and multimedia software such as Microsoft Encarta only expected 256 colours. Using Adobe Photoshop however is where the higher colour palettes would be most beneficial.
We’ll begin by opening Windows Setup via the Main program group. A small window comes up showing the current configuration for video, keyboard, mouse, and network hardware. Select Options followed by Change System Settings in the drop-down menu.
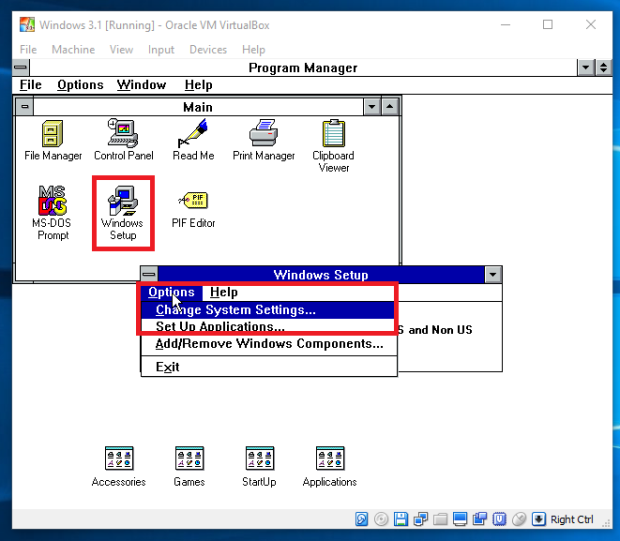
A dialog box similar to the original window now appears with drop-down menus for each of the hardware components. The Display drop-down will currently show VGA. A long list of video drivers that come standard with Windows will appear, however are not compatible with VirtualBox. Scroll your way down until the option Other display (Requires disk from OEM) is chosen. Windows Setup will now request for the floppy disk containing the video card drivers. Load up the disk image with those drivers.

A list of drivers should appear to be chosen. Multiple entries for the same driver can be listed though the resolution, colours, and text size can be different. Unlike later versions of Windows it wasn’t as straightforward to simply change the resolution whenever desired, unless your video card driver came with its own specialised application such as what came with Matrox video cards. I chose the ET4000 1024 x 768 256 Small driver which simply means it’s to run at 1024 x 768 pixel resolution with 256 colours using small sized text. The ET4000 was an actual video card from the early 1990s manufactured by Tseng Labs.
Once installed, Windows will request to restart itself for the new video driver to take affect. If all goes smoothly, Program Manager should reappear somewhat more spacious and the VirtualBox window adjusted due to the increased size.

Now with enhanced display output.
Let’s Get Tada to Play
Windows is looking good, but there’s nothing to hear. Let’s get the sound working.
Installing drivers with Windows 3.x was never consistent, the video and network cards via Windows Setup, the sound card via the Control Panel or in DOS itself. For VirtualBox double check that the sound settings for the VM itself are set to SoundBlaster 16 as this is the sound card to be emulated. Grab a copy of the SoundBlaster 16 drivers for DOS, and totally exit out of Windows. Insert the sound driver disk image and type at the C:\> prompt a:\install and press Enter to load the installation program.
The SoundBlaster 16 installation program.
It will go through a series of steps such as where to install the drivers and configuration settings which can all be left with the default options. As Windows is installed, the program will recognise this and ask whether a config file is to be backed up before being replaced. Choose Backup.

Asking whether you wish to back up MIDIMAP.CFG before being overwritten.
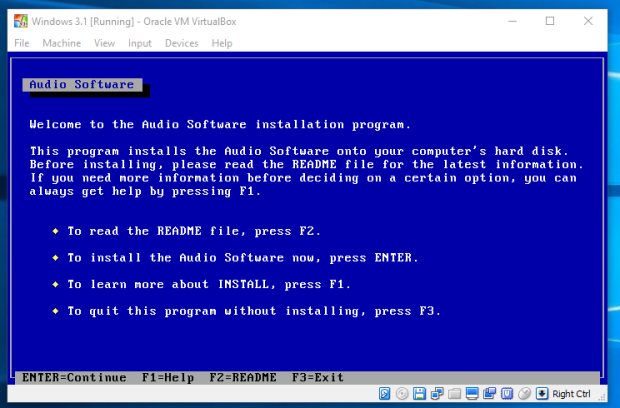
Once you reach the end of the installation process, restart the VM in order for the sound drivers to be loaded. When you return back to Windows, a new program group will appear named Audio Software with the Creative Mixer program available for use. Creative Mixer works much the same as Volume Control that became available with Windows 95 onwards.

Creative Mixer icon and the program itself.
Sound with VirtualBox however isn’t perfect. You’ll find that playing WAV files will be okay, though MIDI playback is a no go. Due to this, it’s trial and error if you decide to play some games. I installed DOOM as a test and as expected the music wouldn’t play, though would hear the sound effects. The sound effects were glitchy – if I fired the pistol once, I’d hear the firing sound effect an additional three times consistently.
Using your CDs
Installing Microsoft Office 4.x over a couple of dozen floppy disks can get tedious very quickly. With that in mind, it’s worthwhile adding support to access your ‘CD-ROM drive’. Just like the floppy disk images used earlier, we can simply mount ISO images of CDs instead of using your CD/DVD drive with physical discs, although that is still an option. For the purposes here I’ll refer to it as a CD-ROM drive as that’s historically accurate for this operating system and you’re more likely these days to be using a Blu-ray drive or not have one at all.
Only two files are required in order to have your CD-ROM drive accessible. One file is included with MS-DOS 6.x named MSCDEX.EXE that needs to be placed into your AUTOEXEC.BAT file to load as the computer starts. The other is a SYS file to be loaded from CONFIG.SYS. This can be one of several SYS files as often CD-ROM manufacturers would provide their own. I tend to stick with the SYS file named OAKCDROM.SYS as it just works on everything I’ve used it on.
Either using the copy command in DOS, or via File Manager in Windows copy OAKCDROM.SYS over to your hard disk from a floppy disk- either to C:\ or C:\DOS. I tend to place it inside DOS to keep it together with MSCDEX.EXE.
For the next bit again you can either do this in DOS using MS-DOS Editor, or within Windows using the System Configuration Editor. It doesn’t matter which, it’s purely on personal preference. To see and edit your AUTOEXEC.BAT file from DOS, simply type edit autoexec.bat at the C:\> prompt. Alternatively in Windows, go to Program Manager, select File, followed by Run. The Run dialog box appears. Type sysedit and the System Configuration Editor appears with four files opened including AUTOEXEC.BAT.
The following line is to be added to AUTOEXEC.BAT:
LH C:\DOS\MSCDEX.EXE /D:MSCD001

Editing AUTOEXEC.BAT using System Configuration Editor.
Next add the following line to CONFIG.SYS:
DEVICEHIGH=C:\DOS\OAKCDROM.SYS /D:MSCD001

Editing CONFIG.SYS using MS-DOS Editor.

Once done, close out of the editor and restart the VM. You may notice as the VM starts there’s mention of the CD-ROM driver as it’s being loaded into memory. If you open up File Manager and see an additional drive available (a D drive) then that’s enough indication that you may start using CDs.
Networking from DOS
The last component to complete our Windows 3.1 VM is to arrange access to files across the network. Normally in the past I would use Windows for Workgroups 3.11, as this was better equipped for networking and generally easier to set up. Based on Windows 3.1, Microsoft released Windows for Workgroups to enhance networking support as this was a glaring omission compared to the likes of OS/2 and Apple’s System 7.x software at the time.
For this, grab a copy of Microsoft Network Client 3.0 for MS-DOS. Originally these were distributed as two files to create floppy disk images, DSK3-1.EXE and DISK3-2.EXE. Both files will comfortably fit onto a single floppy disk, and can be transferred to the VM using a disk image. As I’m using Windows 10 64-bit, I’m unable to simply execute these directly.
Once the two files are on the VM’s hard disk, the easiest way to extract and transfer the files to a blank floppy disk image is to use the following command:
DSK3-1 /E A:
This will extract the files directly to your floppy drive. Likewise do the same with DISK3-2.EXE with another blank floppy disk image.
With the first floppy disk mounted, type a:\setup and press Enter. The setup program for the Microsoft Network Client should appear as below. Press Enter again to continue.

You’ll then be asked where to install, with C:\NET being the default. Press Enter.
Setup will request for you to choose the appropriate network driver to install. For VirtualBox we need to choose the option Network adapter not shown on the list below and use the driver disk image that includes the Advanced Micro Devices (AMD) PCNET driver, which essentially is a file named PCNTND.DOS.

Use the highlighted option shown for VirtualBox.

The AMD PCNET driver to install.
When attempting to install the AMD driver, it will ask as to whether you wish to set the network buffers for performance. I chose the C option to go without optimising as I’d rather have as much memory as possible to run DOS applications. Next will be to ask you for a username.

Once at this screen below to confirm the configuration, we will do some adjustments.

Highlight Change Setup Options and press Enter. By default, the Full Redirector is set as the option allowing you to connect to network domains. The downfall is that this causes an additional spike in memory usage and without optimising your AUTOEXEC.BAT and CONFIG.SYS files can lead to ‘out of memory’ type errors.
The Basic Redirector is all we need for a workgroup network setting most likely found at home. Use this option instead.

Change to the Basic Redirector option.
Back to the options menu, highlight Change Network Configuration and press Enter. The default option is to install the NWLink protocol which was Microsoft’s implementation for Novell Netware common for the era. There’s no value in using this, so instead choose to install TCP/IP and remove NWLink. With those two changes done, you may highlight The listed options are correct and press Enter.
Setup completes and advises you that your AUTOEXEC.BAT and CONFIG.SYS files have been changed so that Microsoft Network Client is loaded upon system bootup. Press Enter to restart your VM.

Once the VM restarts, you’ll notice that the network driver is loaded and will ask for your username and password. In this example, I’m going to connect to a network share located on a Windows 2003 R2 Server VM I have running on my Windows Server 2012 home server. This VM had been configured to allow file access from earlier Windows operating systems.
For the username and password, I use the same details as what I used to log into the VM for a general user account that has permissions to the network share. On the first time entering these details, a file will be created to store the password as USERNAME.PWL under C:\NET where USERNAME is the username you entered.
With the VM set up to use its network adapter as bridged, it should be able to automatically receive an IP address if you have DHCP enabled on your network router. To check what the current IP address is type ipconfig c:\net and the VM’s IP address will appear.
If you wish to change settings you can use MS-DOS Editor to view the following files. This doesn’t cover all the options but gives you an idea:
SYSTEM.INI – Allows you to change the computer name, workgroup name, file and printing sharing on or off, and the network driver to use.
PROTOCOL.INI – Allows you to change settings relating to TCP/IP such as whether to disable DHCP and using a static IP address instead.
With communication going, we’ll look at mapping a drive letter to a network share. For this we use the net command. The net command comprises of several commands that can be used in relation to connectivity such as mapping a network drive, or logging off the network connection.
To see the list of commands available type net /? |more at the DOS command prompt.
For connecting to a network share, that will remain easily available for later use type net use e: “\\computer\share” /persistent:yes and press Enter replacing computer with the actual computer name and share to the network share itself. This means that the network share will be available as Drive E and will be automatically reconnected when typing the username and password at a later stage.

Once back in Windows and open up File Manager, you’ll notice an additional drive appearing the same as the hard disk as Drive E. You can now freely copy files over to your VM’s hard disk or access installation files to install your games and applications.
Although not mandatory, I recommend installing the updates that became available for Windows 3.1 such as the File Manager update. The original File Manager had a bug in not displaying post 2000 calendar years correctly.
I also recommend creating a backup of your VM as it is now, so you won’t need to set up it if you happen to mess things up.
You’ve now got a functional Windows 3.1 virtual machine with VirtualBox!

How do I get oakcdrom.sys onto my Windows 3.1
LikeLike
Easy way to copy over OAKCDROM.SYS into your virtual machine, is to mount a floppy disk image of a Windows 98 boot disk. There’s one available under the Downloads section.
LikeLike
When I start Windows after using the video driver you mentioned, it says, “An error occurred while trying to initialize the video adapter. Hit any key to continue”. What am I doing incorrectly?
LikeLike
Generally occurs from either a corrupt or incompatible driver. However with the specific drivers provided, I haven’t come across this issue with VirtualBox. Now that Windows is unable to start, it’s best to use the DOS version of Windows Setup to change the driver. In DOS at the C:\> prompt, type “cd\windows”, hit Enter, then type “setup”. The original option of “VGA” under Display will at least get Windows starting up again, if something goes amiss.
LikeLike
Thanks for this! When you say
For connecting to a network share, that will remain easily available for later use type net use e: “\\computer\share” /persistent:yes and press Enter replacing computer with the actual computer name and share to the network share itself.
Is the “actual computer name” the name of my host PC? What is the “share”? I tried making a shared folder in VirtualBox, but anyway it doesnt seem to be detecting my host PC’s name on the network…
LikeLike
“Actual computer name” is the name of your host PC, instead of referring to the computer’s IP address on the network. The “share” is the shared folder on this host PC. For example, “\\david-pc\downloads” if you were sharing your Downloads folder. Note that when I mentioned “This VM had been configured to allow file access from earlier Windows operating systems.”, I’m referring to the fact that I’ve adjusted a registry setting to allow less secure Lan Manager authentication. I didn’t divulge into this for the sake of simplifying the tutorial.
LikeLike
Hi, i m stuck at audio.
I installed your audio drivers and then i liste music at win3.1 startup, so it seems to be good. But later i play a game and don’t ear anything. Then i tried to play a WAV file with ACCESSORY–>MULTIMEDIA PLAYER, and it works. I tried to play MIDI file and it doesnt: it doesnt give me errors, simply goes on but no sound.
How can i play MIDI files?
Thanks a lot
LikeLike
Under VirtualBox, that’s the best you will get it as it’s not emulating a complete sound card. Only wavetable will work, so no MIDI synthesiser support. For games I recommend PCem more.
LikeLike
I just want to thank you for this content. Cheers!
LikeLiked by 1 person
I suggest to download also small but useful files – DOSIDLE for MS-DOS and WQGHLT.386 for Windows 3.1x to drop CPU usage to zero
LikeLike