 Many of those that used MS-DOS in its heyday, would remember spending time on these two files – AUTOEXEC.BAT and CONFIG.SYS to optimise and configure their PC as needed. Sometimes careful placement of commands were needed to maximise the 640 KB of conventional memory to avoid “out of memory” errors for Windows applications and games. When you knew you had overall 8 or 16 of MB RAM in those days thinking you had plenty, let’s just say it had its moments of frustration due to TSR (Terminate and Stay Resident) programs and so forth.
Fortunately we don’t need to worry about now, but I think the flip side to that was that it felt like an accomplishment when you had your PC well configured at a time when using a computer wasn’t common knowledge like it is today and with ever increasing automation.
For those running MS-DOS in some form, this is a quick reference guide to both of these files, and what many of the more common commands meant. Usually on Drive C or boot floppy disks, both of these files are located on your start up disk at the root directory (i.e. at A:\> or C:\>).
Note that it’s easy to cause issues with DOS upon start up just from a typo that may cause hardware not to function for instance, so it doesn’t hurt to create a backup copy of these files before making any changes.
Before we get into the actual files itself, it helps to understand at least a basic understanding of memory. I’m sure some of you know in great detail how this works, but for those that don’t know or have forgotten over the years, the next part is a basic explanation of the different memory components.
BASIC OVERVIEW OF MEMORY
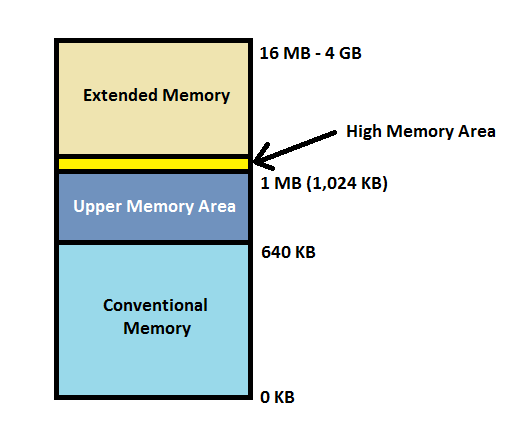
Based on the x86 architecture, there became four sections as it were in relation to memory as shown in the diagram below. Despite the technological advancements over the years, the same logic applies since the original IBM XT PC in 1981.
Memory management.
Conventional Memory
Conventional memory is the first 640 KB of memory that was instantly accessible by DOS to be used for running programs. Programs initially could only consume this space, though over time with additional device drivers in memory and so forth it became more troublesome. Back in the early 1980s, the first 64 to 256 KB of memory could be found on the motherboard directly, with the use of an expansion card to extend the size. The IBM XT PC and a number of PC compatibles used the Intel 8088 processor that could support up to 1 MB of RAM due to limitations of the 20-bit address bus. It also only supported running in real mode.
Upper Memory Area
For the remaining 384 KB of the first 1 MB, the upper memory area (UMA) was dedicated to hardware functions such as the video adapter, system BIOS, and peripherals. In reality a large portion of this memory space was available for use. Gradually when using only conventional memory was becoming problematic as programs grew in complexity, techniques were developed to utilise this space as useable RAM known as upper memory blocks (UMBs). Programs such as MS-DOS’ own EMM386 and MEMMAKER, and Quarterdeck’s QEMM allowed certain driver programs (i.e. MSCDEX for CD-ROM drives) to be moved into the UMA to free up space in conventional memory, which would result in more memory available for your DOS programs.
A joint cooperation between Intel, Microsoft, and Lotus developed LIM EMS. This stood for Lotus Intel Microsoft Expanded Memory Specification, though was generally referred to as just EMS. It was implemented to overcome the issues of being restricted to 1 MB of RAM with 8088 and 8086 PCs in use at the time. Bank switching techniques were use by re-addressing extended memory into the UMA with the use of memory expansion cards before 386 PCs came about.
High Memory Area
Above the UMA sat the high memory area (HMA) and is only just shy of 64 KB in total that became available with the introduction of Intel’s 286 processor and extended memory found in the original IBM AT and compatibles. The 286 processor had a 24-bit address bus and could support up to 16 MB of RAM. It was also the first to support both real mode and protected mode, though real mode was meant to be fully compatible with how an 8088 processor would operate for software compatibility and be limited to only 1 MB of RAM. To cut to the chase, the HMA was reserved due to an issue with supporting real mode that utilises only a 20-bit address bus like with the 8088. Instead of using a memory address within that bus, it uses the next following memory address that is available from having a 24-bit address bus. Due to this, when a 286 PC was in real mode it could access the HMA just above the 1 MB threshold.
With the introduction of MS-DOS 5.0, HIMEM.SYS was available to allow the DOS kernel to be loaded into the HMA to preserve conventional memory. HIMEM.SYS was also required to utilise RAM above 1 MB.
Extended Memory
For PCs with a 286 or greater processor this simply referred to the memory above the first 1 MB of address space. Apart from the HMA, the rest of this memory was not available in real mode. A PC needs to run in protected mode to make use of the additional memory. As mentioned just before the 286 had a 24-bit address bus supporting up to 16 MB of RAM, with 15 MB as extended memory. When the 386 processor was introduced it came with a 26-bit address bus that allowed up to 4 GB of RAM to be theoretically addressed. In reality however I haven’t seen a 386 with anything greater than 64 MB of RAM. Combined with the HMA, it’s known as the Extended Memory Specification (XMS).
CONFIG.SYS
Out of the two files, CONFIG.SYS is loaded first by DOS and handles the configuration of your PC’s components. Sometimes what’s loaded here is complimented with another component that is to be run afterwards via AUTOEXEC.BAT. This typically occurs for CD-ROM drives and sound card drivers.
Below is a list of examples of what you may find in your CONFIG.SYS file:
BUFFERS=10,0
Allocates memory for disk buffers when the computer starts from the hard disk, that’s used for transferring data to and from the drive. The first value of 10 here is to specify the number of disk buffers. The value range is from 1 up to 99. The following value shown as 0 is an optional value and specifies the number of buffers in the secondary buffer cache. The default value in MS-DOS 6.x is 0 though the range is 0 up to 8. MS-DOS 5.0 would default to 1 as the zero value wasn’t yet available.
In this example the value of 10 would mean allocating between 256 to 511 KB of RAM for this purpose. If buffers are not specified, the default value will be used based on the amount of memory available. Isn’t a mandatory option.
COUNTRY=061,,C:\DOS\COUNTRY.SYS
Applies the appropriate currency, time, and date conventions for the selected country and determining the characters that can be used for filenames. In this example the value 061 represents the country in this case International English, while a 001 value would represent the United States. The values tend to match or closely match the country’s international dialling codes. The following between the commas can be utilised to specify a specific character set. Non-English orientated MS-DOS versions such as Arabic and Japanese will have separate character sets and options available. At the DOS prompt, use the command help country to bring up the MS-DOS Help program with additional details.
DEVICE=C:\DOS\EMM386.EXE NOEMS
Provides only access to the UMA.
DEVICE=C:\DOS\EMM386.EXE RAM
Provides access to both UMA and EMS.
DEVICE=C:\DOS\EMM386.EXE 1024 RAM
Specifies the maximum amount of extended memory to use to emulate EMS. By default it’s the amount of free extended memory when EMM386 is loaded, but you may adjust to as low as 64 or as high as 32,768 KB. In this example 1,024 KB has been specified.
DEVICE=C:\DOS\EMM386.EXE MIN=0 RAM
(For MS-DOS 6.x) Allows you allocate the minimum amount of extended memory to use to emulate EMS. EMM386 will reserve this specified amount with the value in KB. The range is set between 0 KB to the maximum stated above. By default the value is 256 KB.
Other lesser used switches are available such as reserving memory addresses for UMBs, and shadow RAM. At the DOS prompt, use the command help emm386 to bring up the MS-DOS Help program with additional details.
DEVICE=C:\DOS\DISPLAY.SYS CON=(EGA,,1)
DISPLAY.SYS is used by DOS to display international character sets on EGA, VGA, and LCD monitors. The EGA value is used for both EGA and VGA monitors, otherwise the LCD value can be used.
Between the two commas the value is null, however this specifies the character set that your PC supports. Using the typical American/English version of DOS, it’s limited to character sets using the Latin alphabet such as Canadian-French. The value 437 can be used for United States, value 852 for Slavic, and value 863 for Canadian-French for example.
The following value of 1 represents the number of character sets your PC can support. If using EGA the maximum value here is 6, otherwise if LCD is used it can be no greater than 1.
At the DOS prompt, use the command help display.sys to bring up the MS-DOS Help program with additional details.
DEVICEHIGH=
Does the same as DEVICE= though loads the device driver into upper memory.
DOS=HIGH,UMB
Sets whether MS-DOS is to use the high memory area (HMA), and also whether upper memory blocks (UMBs) will be accessible. Frequently only DOS=HIGH is used.
FILES=30
The value is to specify the number of files that can be open at one time (program files, documents, etc.). A value too low may cause a program not to start at all, a value too high may affect performance. By default MS-DOS had used the value of 8, though installing a fresh copy of MS-DOS 6.22 would add this line in CONFIG.SYS with the default value of 30. The range is anywhere between 8 and 255, though the values of 30 and 40 were commonplace.
LASTDRIVE=Z
The range of values is A through to Z, and is to specify the maximum number of drives to be accessibly via MS-DOS. Isn’t a mandatory option.
NUMLOCK=ON
The value is either ON or OFF, to specify whether the Num Lock key is to be on or off when the computer starts. Useful if creating a menu via CONFIG.SYS, otherwise isn’t a mandatory option.
REM or ;
The following text is descriptive, not a command as such. Useful if you wish to note down about a particular command for future reference.
STACKS=9,256
Specifies the amount of memory to reserve for processing hardware interrupts. The value here of 9 represents the number of stacks. A valid value is either 0 or in the range of 8 through to 64 inclusive. The second value, 256, represents the size in bytes of each stack. A valid value is either 0 or in the range of 32 through to 512 inclusive.
AUTOEXEC.BAT
This file runs as a batch running each command in the exact order they’ve been placed. From here is where device programs are loaded, DOS environmental settings are set, and starting Windows automatically if desired.
@ECHO OFF
Anything after this command will not be visibly seen when the computer starts, but will run in the background. It’s effectively a way to minimise excessive text and screen scrolling when processing the commands.
PROMPT
Allows customisation of how the command prompt is displayed. If the command is used without any switches, the DOS prompt will simply appear as C> with C representing the active drive. Early versions of MS-DOS would have it appear this way by default.
PROMPT $P$G
Arguably the most common setting. The $P value represents showing the current drive and full directory path, and having the $G value afterwards represents having the greater-than symbol, e.g. C:\>.
PROMPT Hello!
Instead of using the available switches free case-sensitive text can be used instead. Therefore instead of seeing C> or C:\> for example, you’ll see Hello! or whatever text that was chosen.
PROMPT Hello! $P$G
You can then get creative based on the order. So with this command your DOS prompt will appear as Hello! C:\>.
Entering prompt/? at the command prompt provides the list of switches available. For convenience, here’s what can be chosen. Remember it’s going to appear in the order of the switches.
$Q – = (equal sign), $S – $ (dollar sign), $T – Current time
$D – Current date, $P – Current drive and path, $V – MS-DOS version number
$N – Current drive, $G – > (Greater-than symbol), $L – < (Less-than symbol)
$B – | (Pipe symbol), $H – Backspace (erases previous character)
$E – Escape code (ASCII code 27, left arrow symbol), $_ – Carriage return and linefeed
Creating a Customised Startup Menu
Typically a DOS-based system would start in a set configuration – load a few drivers, maybe automatically start Windows and that’s about it. You may find though, particularly with DOS games they can be fussy with the amount of conventional memory available. To minimise the hassle on an ongoing basis avoiding out of memory messages and the like, it’s possible to create a customised startup menu to set different system configurations based on your needs. This feature was introduced in MS-DOS 6.0.
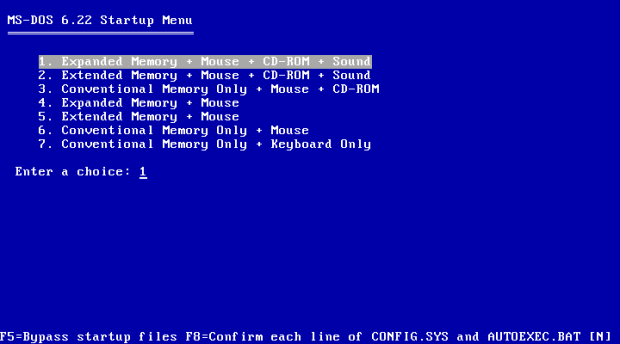
Here I created a menu where by default after 10 seconds, Windows 3.1 will automatically start with sound and CD-ROM device drivers. In addition, a DOS sub-menu providing several options with memory and device drivers for various scenarios set out below. For comparison I’ve also mentioned the difference it makes to available conventional memory.
- Expanded memory, mouse, CD-ROM and sound card support (516 KB free)
- Extended memory, mouse, CD-ROM, and sound card support (488 KB free)
- Conventional memory only, mouse, and CD-ROM support (477 KB free)
- Expanded memory and mouse support (584 KB free)
- Extended memory and mouse support (556 KB free)
- Conventional memory only and mouse support (539 KB free)
- Conventional memory and keyboard only (556 KB free)
Note keep in mind depending on the hardware or virtual machine application used, device drivers can vary. In the below examples, I’ve used the Oak Technologies CD-ROM and Creative SoundBlaster 16 device drivers. Installing additional software or hardware at a later stage will likely require additional tweaking of these files to avoid unintended results.
CONFIG.SYS
CONFIG.SYS is where the bulk of the commands are located.
The [COMMON] section to start off with is any commands to be run regardless of configuration, such as the display driver and international settings.
The [MENU] section refers to the main menu.
MENUITEM=WINDOWS, Start Windows (Default)
The menu item Start Windows (Default) will appear on the main menu. When selected it will reference down to the [WINDOWS] section of CONFIG.SYS.
SUBMENU=DOS, DOS Startup Options…
Appears as another item as DOS Startup Options… on the main menu, however will bring up an additional menu upon selection. Again it will reference down to the [DOS] section of CONFIG.SYS.
MENUCOLOR=15,1
Refers to the colour of the text and background. In this example the value of 15 displays bright white text, whilst 1 provides a blue background. Without this specified, the default values are 7 and 0 respectively to provide the standard white text on black background. The colour choices go back to the 16-colour palette from the CGA video standard in the 1980s.
The use of ANSI.SYS or invoking the CLS command with reset back to default.
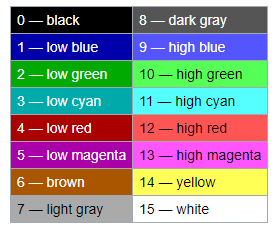
Image source: Wikipedia
MENUDEFAULT=WINDOWS,10
The default option is to start Windows 3.1, with WINDOWS referring to the [WINDOWS] section of CONFIG.SYS. The value of 10 represents the amount of time in seconds to wait before proceeding if no user interaction has occurred.
The [WINDOWS] section is for configuring memory as required for Windows 3.1 to work. As an option, the CD-ROM and sound device drivers were added.
The [DOS] section is to be the sub-menu, listing options in order. Each abbreviation refers to their respective sections within CONFIG.SYS, followed by a description that will appear on the menu.
Sections [CM] and [CKB] are intentionally left empty. The former will rely on AUTOEXEC.BAT to load the mouse device driver, whilst the latter won’t load any device drivers at all.
[COMMON]
DEVICE=C:\DOS\DISPLAY.SYS CON=(EGA,,1)
DEVICE=C:\DOS\SETVER.EXE
COUNTRY=061,,C:\DOS\COUNTRY.SYS
DOS=HIGH,UMB
FILES=40
STACKS=9,256

[MENU]
MENUITEM=WINDOWS, Start Windows (Default)
SUBMENU=DOS, DOS Startup Options...
MENUCOLOR=15,1
MENUDEFAULT=WINDOWS,10

[WINDOWS]
DEVICE=C:\WINDOWS\HIMEM.SYS
DEVICE=C:\WINDOWS\EMM386.EXE NOEMS
DEVICEHIGH=C:\DOS\OAKCDROM.SYS /D:MSCD001
DEVICE=C:\SB16\DRV\CSP.SYS /UNIT=0 /BLASTER=A:220

[DOS]
MENUITEM=EMCD, Expanded Memory + Mouse + CD-ROM + Sound
MENUITEM=XMCD, Extended Memory + Mouse + CD-ROM + Sound
MENUITEM=CMCD, Conventional Memory Only + Mouse + CD-ROM
MENUITEM=EM, Expanded Memory + Mouse
MENUITEM=XM, Extended Memory + Mouse
MENUITEM=CM, Conventional Memory Only + Mouse
MENUITEM=CKB, Conventional Memory Only + Keyboard Only

[EMCD]
DEVICE=C:\DOS\HIMEM.SYS /TESTMEM:OFF
DEVICE=C:\DOS\EMM386.EXE RAM
DEVICEHIGH=C:\DOS\OAKCDROM.SYS /D:MSCD001
DEVICE=C:\SB16\DRV\CSP.SYS /UNIT=0 /BLASTER=A:220

[XMCD]
DEVICE=C:\DOS\HIMEM.SYS /TESTMEM:OFF
DEVICEHIGH=C:\DOS\OAKCDROM.SYS /D:MSCD001
DEVICE=C:\SB16\DRV\CSP.SYS /UNIT=0 /BLASTER=A:220

[CMCD]
DEVICEHIGH=C:\DOS\OAKCDROM.SYS /D:MSCD001

[EM]
DEVICE=C:\DOS\HIMEM.SYS /TESTMEM:OFF
DEVICE=C:\DOS\EMM386.EXE RAM

[XM]
DEVICE=C:\DOS\HIMEM.SYS /TESTMEM:OFF

[CM]

[CKB]
AUTOEXEC.BAT
There’s slightly less to add in AUTOEXEC.BAT. Text highlighted in bold below is what has been added to support the menu. The initial text was part of the original file and can be left untouched.
As you’ll see it is referring back to the CONFIG.SYS file. Each line beginning with a colon is to match the names of each section from CONFIG.SYS. Essentially how it works is that if I chose to start Windows, the device drivers from the CONFIG.SYS [WINDOWS] section load first, then refers to the :WINDOWS within AUTOEXEC.BAT.
If I had chosen to start with only conventional memory and the mouse (therefore referring to the [CM] section of the files), after GOTO %CONFIG% it will skip all the way down and only load the mouse driver, MOUSE.COM.
@ECHO OFF
C:\DOS\SMARTDRV.EXE /X
PROMPT $P$G
PATH C:\WINDOWS;C:\DOS
SET TEMP=C:\DOS
MODE CON CODEPAGE PREPARE=((437) C:\DOS\EGA.CPI)
MODE CON CODEPAGE SELECT=437
GOTO %CONFIG%

:WINDOWS
SET BLASTER=A220 I5 D1 H5 P330 T6
SET SOUND=C:\SB16
SET MIDI=SYNTH:1 MAP:E
C:\SB16\DIAGNOSE /S
C:\SB16\MIXERSET /P /Q
LH C:\DOS\MSCDEX.EXE /D:MSCD001
LH C:\DOS\MOUSE.COM
WIN
GOTO END
:EMCD
:XMCD
GOTO SOUND
GOTO CDROM
GOTO MOUSE
GOTO END

:CMCD
GOTO CDROM
GOTO END

:EM
:XM
:CM
GOTO MOUSE
GOTO END

:CKB
GOTO END

:SOUND
SET BLASTER=A220 I5 D1 H5 P330 T6
SET SOUND=C:\SB16
SET MIDI=SYNTH:1 MAP:E
C:\SB16\DIAGNOSE /S
C:\SB16\MIXERSET /P /Q

:CDROM
LH C:\DOS\MSCDEX.EXE /D:MSCD001

:MOUSE
LH C:\DOS\MOUSE.COM

:END
CLS
Below screenshots are the end result. Other options that could be made are creating RAM disks, creating a list of your favourite games, starting batch files, and so on.


I still remember playing with config.sys & autoexec.bat to shave off some precious RAM! There were some automatic tools that tried to optimize the order in which device drivers and so were loaded, but at the end a final manual tweaking was almost mandatory.
Many thanks for the technical info, all this knowledge is almost lost now, when being “computer-savy” means to be able to press a few keys here and there.
LikeLiked by 1 person