Unlike my previous post, setting up Windows 95 is considerably different. Again I’ll be using Oracle VirtualBox 5.1.4. While it can be made to work in a useable state, it wasn’t offered the same support to the likes of Windows NT 4.0 or 2000.
There were a few revisions of Windows 95 since product launch generally offered for the OEM market, the latest being OSR 2.5. My personal preference is OSR 2.1 as it didn’t come preloaded with Internet Explorer 4.0, which had a tendency to bloat the general Windows interface with web orientated options akin to Windows 98. OSR 2.1 came instead with Internet Explorer 3.0 which kept to itself and more inline with the original Windows 95 interface. Not only that but I found IE 4.0 on real hardware of the time (e.g. a Pentium 100 with 16MB RAM) to be fairly sluggish in comparison.
For this the process should more or less be the same whichever you choose, however I’ll show you with the OSR 2.1 release.
For this guide you’ll need to have:
- Oracle VirtualBox installed
- CD or ISO image of Windows 95 (alternatively use the floppy disk version)
- Windows 95 boot disk Windows 95 OSR 2 Boot Disk.zip^
- SciTech Display Doctor 7.0 Beta SciTech Display Doctor 7.0 Beta.iso*
* Source file from FileRing under the ‘Drivers’ page.
^ Source file from FileRing under the ‘OS Add-ons & Updates’ page.
Setting Up The Virtual Machine
As I’ve covered a little more detail in setting up a virtual machine in VirtualBox with Windows 3.1, I’ll be skipping over some of the details and be more straight to the point here.
Open up VirtualBox and select New. A Create Virtual Machine dialog box will appear allowing you to select which operating system it will be using for this virtual machine (VM). You may either select the Windows version as shown below, or type Windows 95 and the drop-down selection will automatically change. After this, select Next.
The following option now is to choose the amount of RAM. By default as Windows 95 had been selected, the recommended memory size is 64 MB. Windows 95 will run on the lowest option of 4 MB, though won’t be satisfactory. A historically accurate amount was typically in the range of 8 MB to 32 MB. For this, we will leave it as is. Select Next.
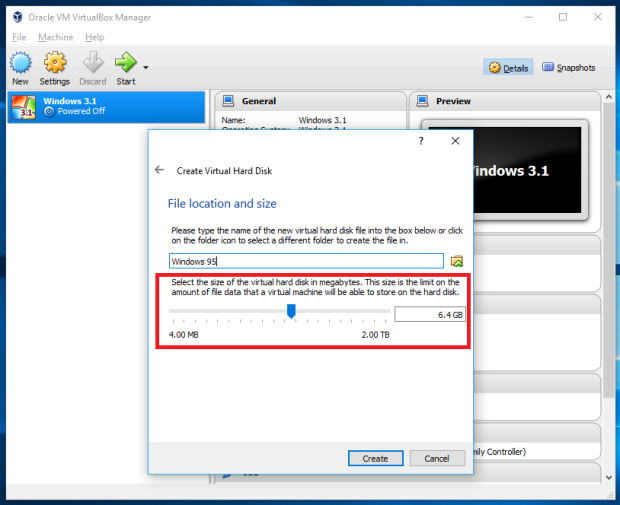
Now the option is regarding a hard disk for the VM. As we don’t have one yet, we will select the Create a virtual hard disk now option and choose Create. Again as we’ve chosen Windows 95, VirtualBox has suggested the recommended size of the hard disk to be 2 GB. Select VDI (VirtualBox Disk Image) and Dynamically allocated over the following couple of options before choosing the size of the hard disk.
If you are using the very original version of Windows 95 (the retail version) or OSR 1, it’s recommended to keep the disk size at 2 GB. If you are using the OSR 2 or later release you may increase above this as these support the FAT32 file system. Again as I’m using OSR 2.1 I’m going to increase it to 6.4 GB, an accurate size for a physical hard disk in the late 1990s.
Retail and OSR 1 set the size no longer than 2GB, otherwise you may increase.
Before continuing, check that the following settings are in place for this VM:
- System > Acceleration tab > Deactivate the VT-x/AMD-V and Nested Paging
- Display > Scale Factor > Default is 100%, useful for enlarging low resolution output on our modern resolution displays if desired
- Audio > Audio Controller > Use Sound Blaster 16
- Network > Adapter 1 > Use Bridged Adapter and ensure it’s a PCNET-Fast III
- USB > Deactivate the USB controller (if you’re using a release prior to OSR 2)
With the VM created, you may start it and mount both the Windows 95 floppy boot disk and the Windows 95 CD whether it be via physical drive or image file. You won’t be able to boot up with the CD alone.
Restart the VM and you should see the following. By default when the CD-ROM driver is loaded, it’s designated as Drive R. I suspect this is just to avoid any issues if someone decides to create or has multiple partitions on their hard disk.
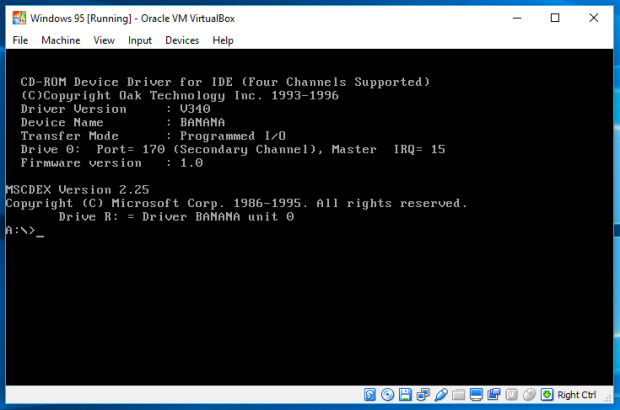
Started with the Windows 95 boot disk.
Although one could start Setup from the Windows 95 CD with their CD-ROM drive as R, it tends to cause an issue during installation, in particular at the point of installing drivers in the final stage. This is because during installation the floppy boot disk is no longer required and will boot from the hard disk instead once most of the files are installed. When this occurs, Setup is still expecting to find additional files on Drive R and although you can change the path to search for the required files elsewhere, it won’t let you access the CD as the driver for the CD-ROM wasn’t loaded. Setup can still be completed, though this has the likelihood of causing missing file errors during Windows start-up or Device Manager in Windows showing issues afterwards.
To avoid this hassle, I tend to copy the main Windows 95 Setup files onto the hard disk after partitioning and formatting the hard disk. That way, the final stage of Setup can then still access the CAB files it is requesting to extract the required files for installation without trouble. At the C:\> prompt, type md win95 and press Enter. This creates a directory (folder) named win95 on the hard disk. Then type copy r:\win95\*.cab c:\win95 to copy the main installation files from the CD to the new directory on your hard disk.
If you wish to change Drive R for the CD-ROM to something else, type at the A:\> prompt edit autoexec.bat to open AUTOEXEC.BAT in MS-DOS Editor to change the designated drive letter. As highlighted below, change the R here to a D. Save and exit MS-DOS Editor and restart the VM. The CD-ROM drive will now become Drive D.
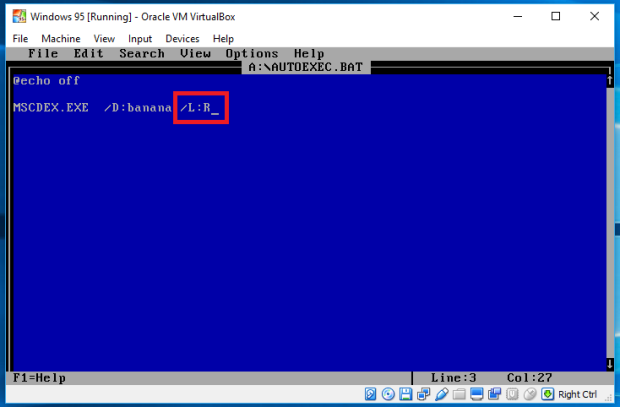
Where to change the assigned drive letter for the CD-ROM drive on the boot disk.
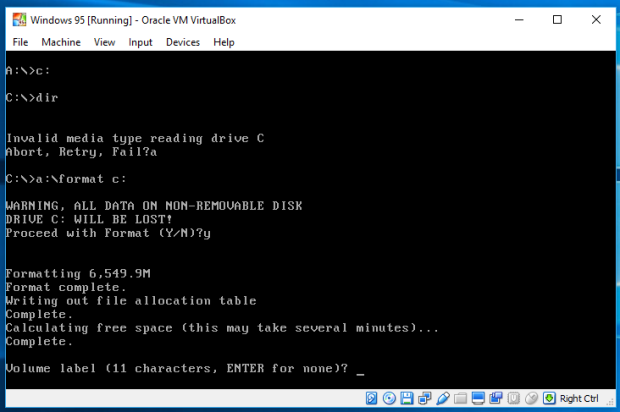
We now need to sort out the hard disk. At this stage typing c: at the command prompt will bring up an error invalid drive specification, meaning basically that the hard disk has not been designated as Drive C and is completely bare. To set up the hard disk, type fdisk and press Enter. FDISK essentially is a DOS utility to configure hard disk partitions. The FDISK utility comes up and as the hard disk earlier was specified as 6.4 GB in size, the first query is whether to enable large disk support. This is to enable the FAT32 file system. After reading the text, press y and then Enter. This is to enable you to use more than 2 GB as a single volume/disk partition, something that was unable to be done with the earlier Windows 95 releases.
FDISK will bring up a menu with four options to select from. Press 1 for the Create DOS partition or Logical DOS drive option followed by Enter. Another menu appears with three options to select from. Press 1 for the Create Primary DOS Partition and press Enter. The hard disk is quickly scanned and you will be prompted if you wish to use the maximum available size of the hard disk. The default option is yes, so press Enter. Choosing not to allows you to only use a portion of the drive as the primary dos partition, and then the remaining space can be utilised as an extended DOS partition.
You will be prompted to now restart the computer. Reset the VM and once back at the A:\> prompt type c: and press Enter. Now instead of receiving the invalid drive specification error as before, you can now be at the C:\> prompt. At this point there’s a partition on the hard disk as Drive C, however it has not been formatted. Typing a command now will bring up the error Invalid media type reading drive C with Abort, Retry, and Fail as options. Type a for abort and press Enter to return back to the C:\> prompt if this was attempted.
At the command prompt type a:\format c: and press Enter. Press y and then Enter to proceed with the format. The FORMAT command then proceeds with a format of the entire hard disk. On real hardware this would take a reasonable amount of time to complete, though under VirtualBox almost instantaneously.
Running the FDISK command.
Once done you’ll be asked to name the volume on the drive, which is totally optional. After that you’ll see some details regarding the size of the volume and be back at the command prompt. The hard disk is now ready to install Windows 95 onto, and you may now copy the CAB files across from the CD as mentioned earlier.
Windows 95 Setup
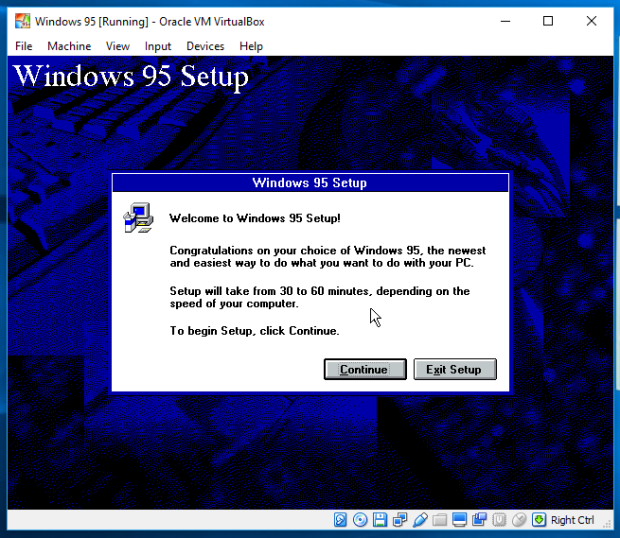
Now that the hard disk is ready to go, we’ll start Windows 95 Setup by typing d:\setup and pressing Enter to begin the installation off the CD. Setup will ask to do a check on your system, so press Enter to continue. ScanDisk will come up to perform a quick check on your VM’s hard disk. As we’ve done the previous steps using FDISK and FORMAT, this should be completed error free. Setup returns congratulating you.
Congratulations!
It states it will take 30 to 60 minutes, though it will be significantly quicker in a VM. Back in 1997 when I used to own a desktop PC with a Pentium 100, 16 MB RAM, and an 8x CD-ROM drive it would typically take around 30-40 minutes to install. Installing on a 486 with 8 MB RAM and that time would easily double.
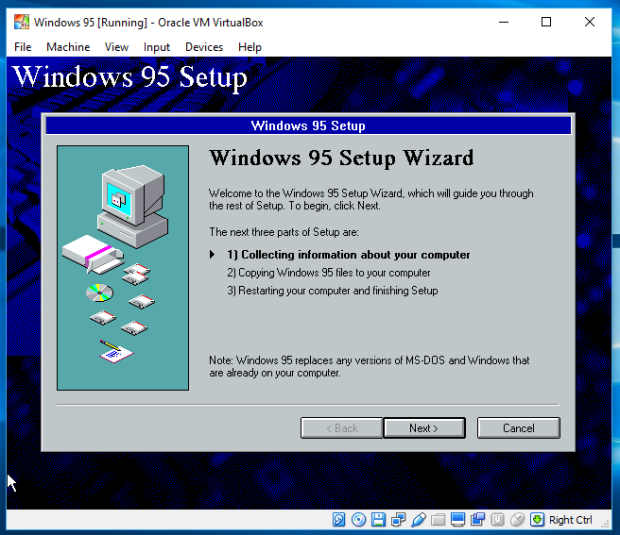
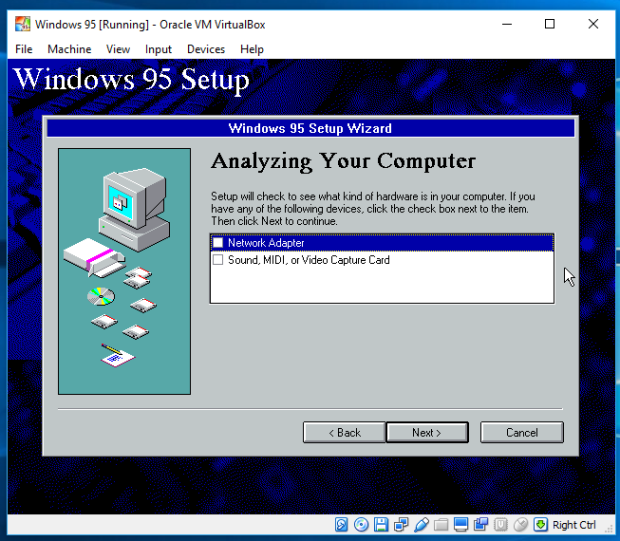
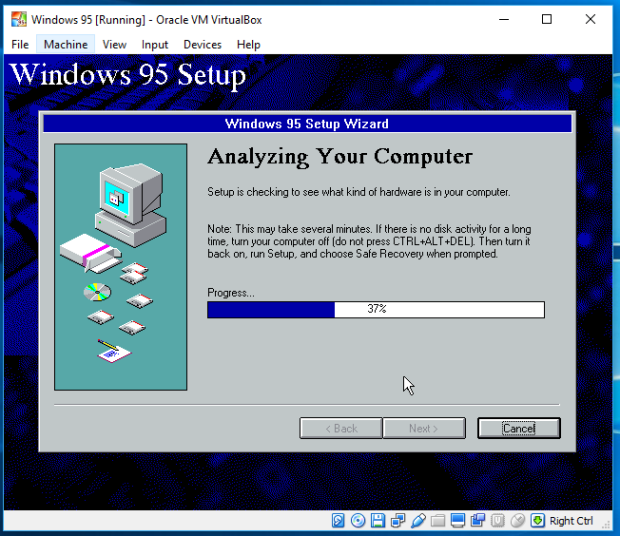
After clicking Continue you’ll be presented with the license agreement, followed by a wizard. The wizard splits the installation into three sections. The initial stage is for Setup to check the hardware installed in your computer. Back in the day, a considerable amount of time was spent waiting for this to be completed. For a number of people this was the first taste of Plug and Play, a feature frequently promoted when Windows 95 was released, that allowed more automatic detection of components without requiring the need to manually select IRQ, DMA settings, etc for it to function (but in reality didn’t always entirely work).
Once the hardware that was able to be detected has been done, the following stage is choosing the components to install and copy the files over the hard disk. Finally the installation is completed configuring the system.
Click Next to continue, and again if you’re happy to install Windows 95 in its default location of C:\WINDOWS. You’ll eventually be greeted with four options for the type of installation to proceed with.

The four options are:
- Typical – As it’s named, this was the most common installation pathway that would have Windows 95 installed with all its bells and whistles. We will go for this option.
- Portable – Similar to a Typical installation, though with some relatively minor changes that includes functionality concerning laptops, i.e. relating to power and battery settings.
- Compact – When disk space was tight, this option could be selected bypassing all the optional components such as games, accessories, etc. that would be installed with a Typical or Portable installation.
- Custom – Allows much greater detail on installation and configuration of Windows 95. Want to use Windows 3.x’s Program Manager instead of the ‘new’ Explorer interface? This could be changed here during installation.
After going with the default option Typical, the next couple of prompts will ask for the product key and your name.
Setup will ask you whether you wish to proceed attempting to detect your network and sound cards. Click on the tick box to detect both, and select Next.
This is where my Pentium 100 would have been grinding the hard disk for several minutes, though in the VM you’ll see a few progress bars scroll across fairly quickly for hardware detection.
A few moments would have passed, and you’ll be given the option to either choose the default choice of optional components or customise it to suit yourself.
Next, choose the name of your computer and the workgroup name of your network if there’s one or leave it as is when asked about your computer’s (VM’s) identification.
Afterwards you are prompted to create a start-up floppy disk. The intent was to use it if trouble occurred and you were unable to load up Windows. Basically it’s just a DOS boot disk, and for this reason I generally never bothered creating one. Details regarding the start-up disk were in a Microsoft support article KB259066. After you’ve created a floppy disk or skipped it, you’ll now be at the next stage to begin copying files to the hard disk.
![]() KB259066 – Windows 98 or Windows 95 Startup Disk Tools and Capabilities
KB259066 – Windows 98 or Windows 95 Startup Disk Tools and Capabilities
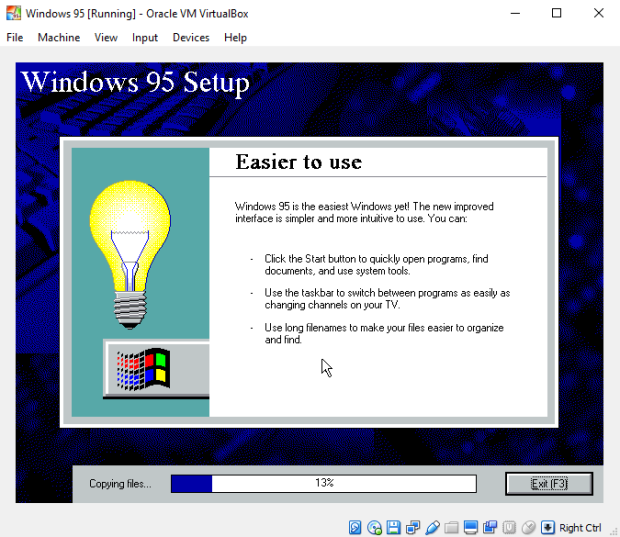
Once files begin to copy it shouldn’t take more than several minutes and you’ll be seeing a bit of a slideshow of the ‘new’ features of Windows. As the installation is much quicker than the hardware it was originally intended for, you’ll will be hard pressed to read all the details as they quickly change.
At the end of copying files, Setup will progress to final stage to restart your computer (VM). Click Finish to continue. You’ll be prompted to remove any floppy disks if there is any still mounted. Once they have been removed, click OK. The VM will restart and Windows 95 will begin to load off the hard disk for the first time.
As we had the VM configured with networking, Windows will begin by asking for a username and password. I’ll be using my typical username and password for user access on my workgroup network.
It was mentioned earlier before setting up the hard disk, that at this stage of Setup there can be an issue with accessing files after the computer has restarted, due to the CD-ROM driver that was from the floppy boot disk is not loaded into memory. The below screenshot is where it’s attempting to find the drivers for the network card that are located within the WIN95_18.CAB file on the CD. If you had copied the main installation files to C:\win95 previously, you could continue with the installation of the required drivers.
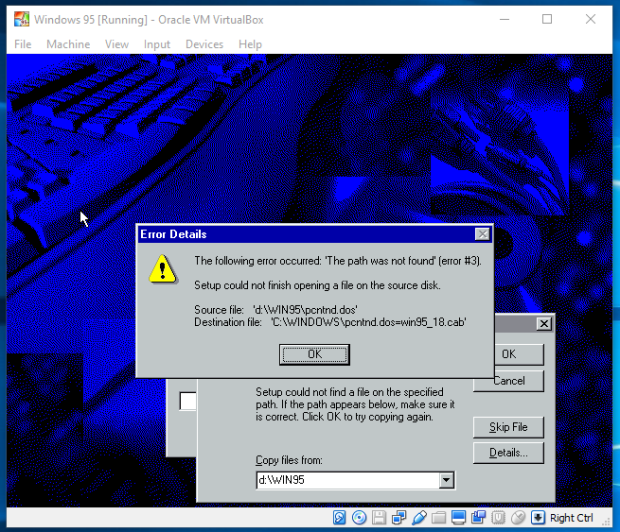
Unable to find the network card drivers as the CD-ROM is unavailable.
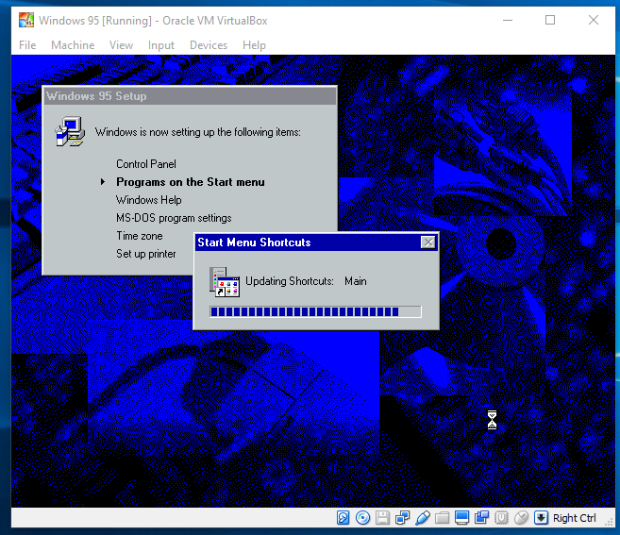
After getting past that, Setup will continue finalising the installation as shown below and will request to confirm your time zone and if you wish to install a printer. Click Cancel when the Add Printer Wizard appears. Setup will now advise that you need to restart.
After the VM restarts and loads up Windows, it will ask for your network username and password. Enter those in and continue if you wish to access your network shares. Pressing Esc will still allow you to continue to the Windows desktop.
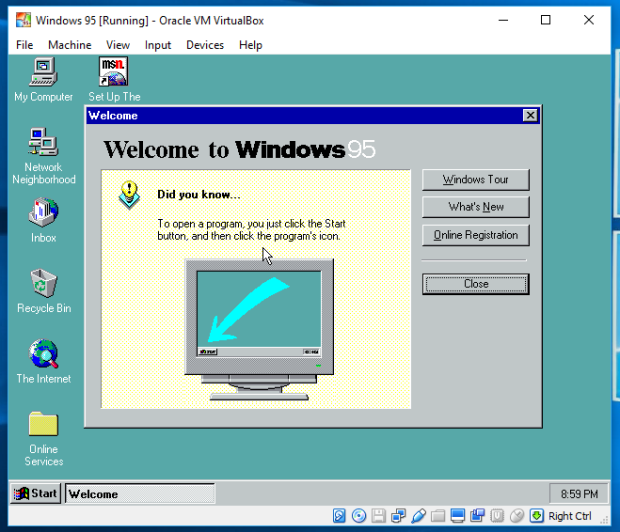
You’ll be greeted with a Welcome to Windows 95 dialog box. There’s a couple of basic tutorials one can do – Windows Tour and What’s New. The Windows Tour is a little interactive guide on using Windows 95 with the ‘new’ user interface, with the focus on handling multiple windows and the Start button. It was aimed for both new and existing computer users. Then there’s What’s New which is basically a standard Windows Help file in a Q&A format that comes up purely aimed for previous users with, e.g. “What happened to File Manager?”.
Configuring Video
VirtualBox for the most part wasn’t ever really optimised for Windows predating Windows 2000. As such, Windows 95 will by default be shown in 640 x 480 VGA.
One of the better video drivers to use to enhance the colour and resolution is named SciTech Display Doctor. It’s a generic VESA driver for Windows 9x. Created by SciTech Software Inc. they were a California based company that were eventually acquired by a Canadian company Alt Richmond Inc. The last version of Display Doctor works well with VirtualBox, though it never made it past beta stage.
The Setup program and the registration key are combined into an ISO image for easy installation. Mount the ISO and begin Setup via My Computer on the desktop. Follow the prompts and you’ll be prompted to restart the computer (VM). Restart the VM and once Windows returns you’ll receive a message stating that Display Doctor needs to be set at least on 256 colours to work correctly.
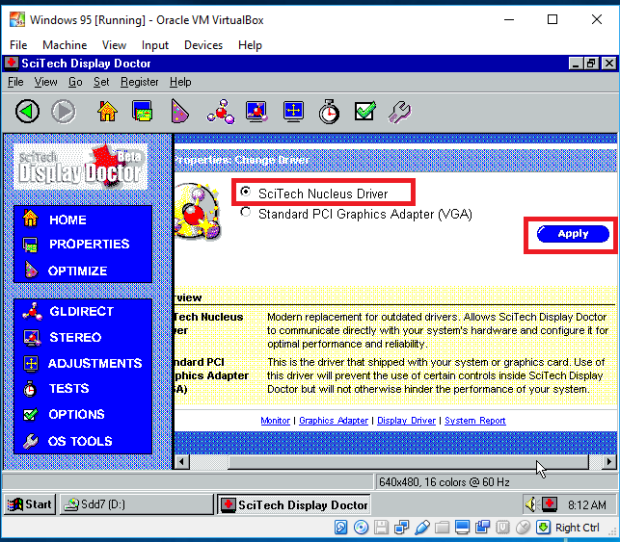
Some manual intervention is required, as the display is still only set to VGA. With the Display Doctor program showing onscreen. Select Properties on the left-hand side, then the hyperlink for Standard VGA 640 x 480 under Monitors. Change this to a Super VGA resolution of your choosing. I picked Super VGA 1280 x 1024 as the monitor under the (Standard Monitor Types) category.
Next select the hyperlink Standard PCI Graphics Adapter (VGA) that is shown currently under Windows Display Driver. Another hyperlink will come up stating the same again as the active driver, click on that. A couple of options will now be shown, one for the standard VGA driver in use, and SciTech’s Nucleus Driver. Select SciTech’s driver and click Apply. Restart when prompted to do so.
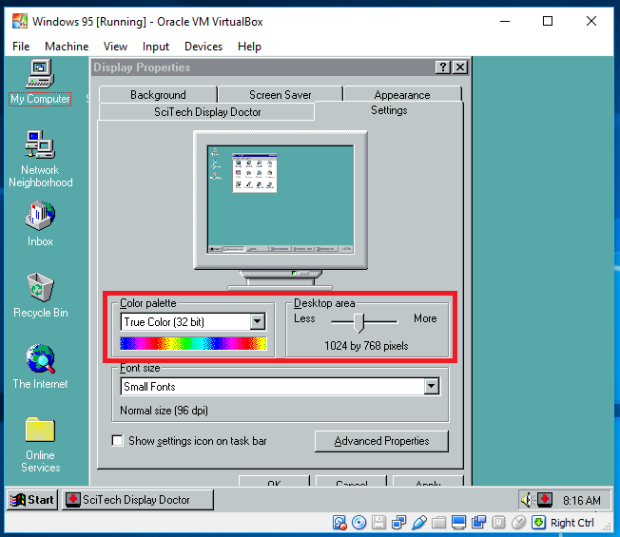
If it goes smoothly, you should hopefully be able to choose your new resolution and colour bit rate, restart, and be able to use the new settings. I find the default turquoise green desktop background to be a darker shade if I know it’s working upon loading up the Windows shell.
Adjusting the resolution and colour bit rate in Display Properties.
Once settings have been adjusted, you’ll likely need to restart again. I chose 1024 x 768 resolution as it comfortably fits within my 23.5″ LCD monitor. If you have one of the newer 30-odd inch monitors, feel free to go for 1600 x 1200 resolution. Alternatively you may use VirtualBox’s scaling video settings. Also remember to use the registration details for Display Doctor so the trial period doesn’t run out.
Windows 95 Networking
As the SoundBlaster 16 and the PCNet III were chosen for sound and network cards respectively, Windows 95 fortunately detects those and has drivers available. As long as you don’t attempt MIDI files, sound should just work though I personally found the volume a bit on the quiet side despite maxing it out. You will likely encounter similar issues playing DOS games with sound as you would under a DOS VM.
While the network card is installed, Windows 95 by default adds the IPX/SPX and NetBEUI protocols. In this day and age, neither will be useful so these can be replaced with TCP/IP. It’s apparent how Novell was a heavyweight during the 1990s, particularly in regards to networking in a business environment.
To change the protocols, on the desktop right-click Network Neighborhood and click Properties. Shown below you should see a dialog box like this one. Under the Configuration tab, you’ll notice a list breaking down the components such as the protocols, network clients, and the physical cards itself.

Network Properties dialog box.
Select Client for NetWare Networks and click Remove. The NetWare client disappears from the list. Do the same for the IPX/SPX and NetBEUI protocols. The list should now only show your PCNet card and the Dial-Up Adapter (if you had chosen to install Dial-Up Networking). Click Add, and a dialog box will appear requesting which network component to install. Select Protocol and click Add. The Select Network Protocol dialog box appears with a selection of protocols available from various vendors. Select Microsoft under the Manufacturers list, then under the Network Protocols list select TCP/IP. Click OK. The list of network components refreshes with TCP/IP added in the list. Click Add again though select Client this time when asked which component and click Add. As before select Microsoft under the Manufacturers list, then under the Network Clients list select Client for Microsoft Networks. Click OK. Click OK again on the Network Properties dialog box. As we added components, not just removed them it will request for the Windows 95 CD. Mount the CD itself or the ISO image and continue. The TCP/IP protocol and associated tools will install. On completion, you’ll need to restart the computer (VM) for the changes to take effect.
Back at the desktop if you have DHCP enabled from elsewhere, your VM should be able to obtain an IP address. To find what it is, you won’t be able to use the standard ipconfig command that is typically used for this. Click Start then Run to bring up the Run dialog box. Type winipcfg and press Enter. A Windows equivalent of the ipconfig tool will appear. You will then discover your IP address.
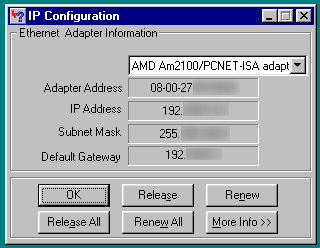
The WINIPCFG tool.
The WINIPCFG application provides similar commands as what’s available with IPCONFIG (e.g. release and renew an IP address). Click on More Info and additional details will appear somewhat similar to typing the ipconfig/all command on other Windows versions.
You should now have no problem connecting to the internet although you’ll find these ancient versions of Internet Explorer next to useless on the modern web. The last supported version for Windows 95 was IE 5.5.
At this point, you’ll find that this is about as good as you’ll get with Windows 95 and VirtualBox.

This is awesome. Thank you.
LikeLiked by 1 person
Hello there!
With new version of Virtual Box v6.1 you can no longer deactivate VT-x/AMD-V.
However, installing a FIX95CPU patch solved the problem completely.
So after “Windows protection error! You need to restart your computer!” error message press HOST+R to reboot the machine and then select “Command Prompt” option from list. From your VB machine menu choose disk image “FIX95CPU.IMA” and the type A:\FIX95CPU.BAT
And voila! Remove floppy disk from virtual drive and you can restart the machine.
It would be nice if you could update that info on your blog. I am a big fan!
Kind regards
Arthur
LikeLiked by 1 person
Hi Arthur, thanks for the tip! Yes, originally when I posted this tutorial, the CPU fix was overlooked. Nevertheless, this emphasises why I had been rather specific with the version of VirtualBox that had been used as changes are inevitable.
LikeLike