
Back in 2014 I began a project to build myself a 486 PC. It proved to be slow going, not just to get the right components, but also spending time troubleshooting. Two years later I finally had it all functioning. Initially the aim was just to have a usable 486 without getting too fussy over the hardware. Maybe with a DX/2 66 processor, 8 MB of RAM, an entry-level ESS sound card, and so forth. However, as things accumulated over time it proved to be better than I had imagined. ‘Ultimate’ can be subjective – no doubt some other enthusiast has one with more RAM and thrown in a TNT 3D video card, but my aim was to keep it fairly period correct.
First off, I’ll go over the components before jumping into assembly and sorting out the software configuration. As it’s been some time since purchase the pricing is based on what I remember, which really equated to building a modern PC. Speaking of which without considering the effects of inflation, it felt some parts were bought at mid-1990s prices.
In 1996 the world moved onto Pentiums, and used 486 PCs were seen under $1,000 AUD. By the turn of the century their value nose-dived, no one really wanted them, even if you gave it away. During this time, much of it was trashed. Since 2010 with the volume of hardware becoming more scarce, and greater interest in retro computing, values have been picking up again.
The Components
486 PCI Socket 3 Motherboard
Condition: New, Price: ~$202 AUD, Location: United Kingdom


I was very close to missing out on this motherboard on auction from eBay. Supposedly it had been kept in a workshop over in England for the best part of 20 years, and was being sold from a deceased estate. The seller didn’t know much about it so was selling it at a very low reserve price. Included was its original box and manual, which came in very handy for setting up the CPU voltage and jumpers in general despite the poorly written English. I couldn’t determine the manufacturer, but the manual is dated from June 1994, placing it towards the end of production which from memory slowed down in 1995. Having a later 486 motherboard meant greater flexibility – with ISA, VLB and PCI slots, 256 KB of (real) cache, and the option to use either 30- or 72-pin RAM SIMMs.
Intel 486 DX/4 100 Processor
Condition: Used, Price: ~$40 AUD, Location: Australia

The DX/2 66 processor was generally a more popular option for its time, and was what I was expecting to get. This DX/4, rated at 100 MHz was perfect. Over the years prices have varied greatly ranging from around $25 to upwards of $100 AUD for a DX/4 chip, so it was just a matter of waiting for the right opportunity to buy at a reasonable price. AMD and Cyrix developed faster chips as an alternative to upgrading to the lower speed Pentiums, but my intention was to keep it as a 486 proper. Although it runs, I do wish to get a heatsink for it.
DTC 2278 VLB Enhanced IDE I/O Controller Card
Condition: New, Price: ~$200 AUD, Location: United States


The 486 motherboard as typical for its time, only has a five pin DIN keyboard connector. An additional controller card is needed to plug floppy and hard drives, and external peripherals such as mice, modems and printers. This was new old stock, sourced from the north east corner of the United States.
AT Mini-Tower Case
Condition: Used, Price: ~$100 AUD, Location: Australia

After purchasing a couple of Pentium systems from a guy up around Bendigo (about an hour’s drive from home), I messaged him on eBay if he happened to have any spare AT cases that he would be willing to depart with. I offered $100 not wanting to go low-ball and he responded with three cases to choose from. Although the case itself is unremarkable, it was in decent condition for its age, and the LCD gives it a nice touch aesthetically. The 200 watt power supply works fine at least for now.
8 MB ATI Rage XL PCI Video Card
Condition: New, Price: ~$20 AUD, Location: China
These video cards have been in abundance on eBay for some time, and aren’t too bad for use in older systems. Having PCI available on the motherboard offers more flexibility and performance than being stuck with VLB and ISA video cards. With 8 MB I thought it would be a good opportunity to run Windows at a ‘decent’ resolution in 24-bit colour, than the typical 1 MB card that was common for a 486 PC. However, as I discovered this video card was the culprit of my woes, needing at least a Pentium system to actually work.
4 MB Matrox Millenium II/Mystique 220 PCI Video Cards
Condition: Used, Price: ~$30 AUD (Millenium II), ~$200 AUD (Mystique 220), Location: Australia


At a later stage I purchased a Matrox Millenium II, followed by more recently the Mystique 220. The Mystique was described as having very little use since new, and as it included the packaging and all the contents it appeared to be more collectible going by the number of bids. Whilst the Millenium II is slightly superior on paper, I’ve now left the Mystique inside after initially testing it. The performance difference isn’t detrimental for it’s intended purpose, which is primarily DOS gaming. It’s nice using Windows at 1,280 x 1,024 resolution whilst maintaining 24-bit colour.
Creative Sound Blaster AWE64 Gold CT4540 ISA Sound Card
Condition: New, Price: ~$300 AUD, Location: United States


Most ISA sound cards I tend to find available are either budget-orientated ESS or Sound Blasters such as the ViBRA16. Occasionally the odd AWE32 would show up. This card was available brand new in shrink wrap, and although expensive I could justify it somewhat. The seller from California originally wanted more but was able to negotiate it down, maybe saving $100 AUD from the original price. Around the time I had also seen a locally used AWE64 card for $100 on its own, but liked the fact I would not be missing any cable accessories, included the original microphone, etc. I’ve really notice the difference with MIDI sound tracks in games – it’s great. From Creative this is their ultimate sound card for an ISA slot and hence DOS gaming. It’s new enough to support Plug n’ Play with Windows 95, though old enough that it was the last hurrah before switching to PCI.
3Com 3C905B-TX XL 10/100 PCI Network Card
Condition: Used, Price: ~$1 AUD, Location: Australia

I bought a random bunch of old network cards from a computer business up in Brisbane, not really knowing if they were going to work, or the brands. I plucked out this card from the lucky dip. Although I’ve connected to the network okay, I do get a sense that it causes the 486 to become unreliable when in use. Windows struggles to boot with a network cable plugged in, and it’s caused crashes simply copying ‘larger’ files across, (i.e. a 25 MB ZIP file). It’s primary purpose is to transfer old games and applications over, reducing the need to use the floppy drive, or burn stuff onto CD all the time.
Maxtor 20 GB D740X-6L IDE Hard Disk Drive
Condition: Used, Price: ~$10 AUD, Location: Australia

Image source: eBay
I purchased several of these drives from a Melbourne-based computer business at once, just to have a few spares around, and is plenty for a 486 PC. PCs from around the era were typically limited to a drive with a maximum capacity of around 512 MB or up to 8.4 GB depending on the BIOS. With a workaround, I’m now able to utilise the full 20 GB.
Panasonic 2 x 16 MB (32 MB) 70ns 72-pin SIMM RAM
Condition: Used, Price: ~$30 AUD, Location: Australia
 The motherboard had the choice of using 30-pin or 72-pin SIMMs, though I decided on the 72-pin option for better performance and larger capacities. 8 to 16 MB was what I was expecting to find without paying a small fortune, so it was good to find 32 MB. It’s a comfortable amount for DOS gaming and running a few Windows programs.
Honeywell 101WN AT Keyboard
Condition: Used, Price: $20 AUD, Location: Australia

Originally I went for the option of using AT to PS/2 keyboard adapters, given PS/2 keyboards are more obtainable. This keyboard was reasonably decent for its time, and appeared to be well looked after over the years. Typing DOS commands on this just feels authentic and is a bit of a nostalgia hit. I think it’s just from the way it feels, sounds, and the lack of Windows buttons.
Microsoft PS/2 Mouse 2.0 with Serial Port Compatibility
Condition: New, Price: $? AUD, Location: ?
Forgetting where or for how much as I have more than one of these, this mouse was still in its retail packaging. A relatively popular mouse during the Windows 3.1 and 95 years, these were well constructed and were ergonomically comfortable to use for extended periods. By default these connect via PS/2, though with the included adapter can plug into a serial port. Microsoft not only sold these on their own, but had also been combined for sale with Windows 3.1 as well as the Office 95 Value Pack.
Dell P190Sb 19″ LCD VGA Monitor
Condition: Used, Price: $7 AUD, Location: Australia
 Last Easter on a road trip to South Australia, I visited a charity shop operated by volunteers. Unlike op shops, they were selling various electrical items which had been tested and tagged. Unfortunately there was no old desktops, though I picked up a couple of LCD monitors on the cheap. This Dell monitor was only $7, only needing a VGA cable for it. It supports resolutions up to 1,280 x 1,024 which paired with the Matrox video card isn’t a problem. If I was to find something more appropriate for a 486, I’d be inclined to get a Sony Trinitron CRT monitor but chances of that happening are slim. The older LCDs are still good though as they retain the 4:3 aspect ratio that older software was intended for.
NEC CDR-1300A 6x IDE CD-ROM Drive
Condition: Used, Price: $? AUD, Location: Australia
I don’t recall where this drive came from, but I suspect it was bought with one of the Pentium systems I have. Manufactured in June 1996, this drive is rated at 6x, thus data transfer is at 900 KiB/s (900 kilobits per second). In 1996, drives at 4x, 6x, or 8x were the norm with 10x speed drives towards the end of the year. I personally had a GoldStar (now LG) 8x drive way back then.
Panasonic 3.5″ Black Floppy Disk Drive
Condition: New, Price: $? AUD, Location: Australia
Just a standard new floppy disk drive. I went for black thinking I was going to have trouble finding a beige AT case in good condition, and would need to settle for something more modern. I wouldn’t mind replacing it with a beige one at some point to match.
Assembly
Starting with the motherboard it was spotless with no signs of physical damage. The old NiMH CMOS battery also had held up well, as these are well known to leak and cause corrosion in the immediate area. I snipped it off to remove the risk of that happening entirely.

Next was the RAM and CPU to be inserted. Compared to modern CPUs, this is where mistakes can easily be made. The 486 CPU can be inserted in the wrong orientation, so extra attention is needed to ensure it’s positioned correctly. One corner of the CPU has a notch with a white dot to signify this is the location of Pin 1 out of the 168 pins. On the socket there’s a lonely pin hole in one corner, to align with this. Once done, it was a matter of referring to the manual, and review the jumper settings available.
Several jumpers were required to set the CPU type and the clock speed – 25 or 33 MHz combined with the multiplier. In the instance of having a DX/4 100 the clock speed is set at 33 MHz with a multiplier of 3 to achieve the 99.99 MHz rated speed of the CPU. Not only that but another jumper had to be changed for selecting the correct voltage to the CPU. Generally 486 CPUs would run at 5 V though this had to be changed to 3.3 V for the DX/4.
With that done it was time to place the motherboard into the case, and connect the power and front panel cables up. Unlike the ATX form factor, the older AT format utilises two power cables that plug beside each other. As with inserting the CPU, it’s easy with these early PCs to plug the power cable the wrong way. Ensuring the black earth cables are at the centre, you can avoid computer suicide.
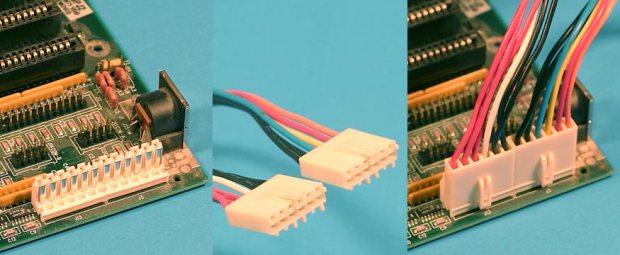
AT power cabling. Image source: http://www.playtool.com
The following steps were trivial, simply inserting the various cards into the motherboard. The DTC I/O Controller card was the most fiddly, considering the need to plug the hard disk and floppy ribbon cabling between it and the motherboard. The cables were just stiff to insert and I was paranoid not to bend any of the pins. Once again the cabling needs to be connected in a certain way, by aligning the red side of the cable to Pin 1 on the IDE and floppy sockets. Plugging these cables in the wrong orientation won’t cause harm, though was a common mistake when you’re left wondering why the computer cannot detect the hard disk or read the floppy disk correctly.
The PC tower was now fully built. Turning it on only a few beeps emitted indicating there was an issue somewhere. The manuals had no reference to the beep codes, so I went to search online. Unfortunately with the beep code I was hearing, there was no match in the standard lists of BIOS codes. I began a process of elimination, pulling out cards, rechecking jumpers, and so forth which came to little progress. By this point I wasn’t sure if a component was faulty, given their age. Long story short, I left this PC to the side for a while pursuing other activities.
A few months past and a Matrox Millenium II video card came up on eBay fairly cheaply. After purchasing the card and testing it, it was discovered the 8 MB ATI Rage card was the source of trouble as I could now POST successfully. I placed the issue down to the incremental changes to the PCI specification over the years. The ATI video card with its universal 3.3 V and 5 V connector required a PC compatible with a slot meeting the PCI 2.2 specifications released in 1998. On the other hand, the Matrox video card being older was only rated for 5 V, and compatible with the older PCI 2.0 specification from 1993. Tossing the ATI card into a Pentium III PC and it worked fine.
Finally the PC was in a usable state!

Ribbon cabling was never much fun to work with.
Setting Up the 486
Since the CMOS battery was removed, there was no power to retain the settings in the BIOS. The motherboard has what is known as an AMI WinBIOS, incorporating a fancier BIOS menu to somewhat mimic Windows 3.x’s Program Manager, and utilise the mouse if detected. After setting the date and time, and floppy disk drive type, I went to detect the hard disk. Eventually a message would appear that there was no hard disk. It would take a reboot and a return to the BIOS in order for auto-detection to work.


When the BIOS detected the hard disk via the DTC card, it gave the capacity of a little over 8 GB, the maximum supported. With a 20 GB drive, it seemed wasteful losing all of that space, so in order to circumvent the limitation, the use of dynamic drive overlay (DDO) software is needed. In this instance with a Maxtor drive, I used MaxBlast 3.6. Effectively it modifies the master boot record, overriding the capacity limitation. The motherboard’s BIOS is none-the-wiser.
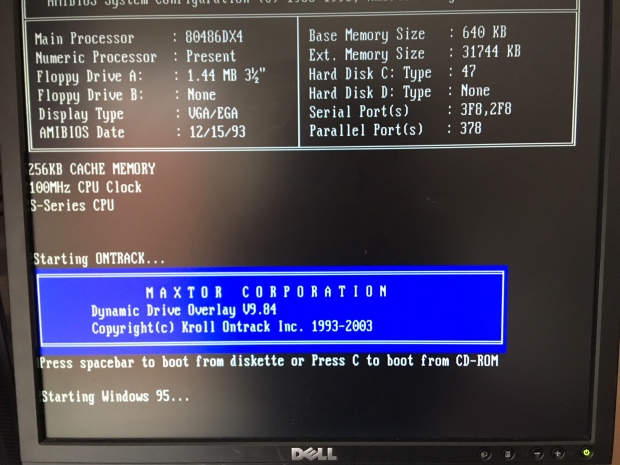
Maxtor’s DDO software in action just before Windows 95 starts up.
Windows 95 OSR 2.1 was the chosen operating system – primarily for the FAT32 file system support that MS-DOS 6.x lacks, is better suited to gaming than NT, and requires less resources than Windows 98. Windows 95 couldn’t be installed in the current state though, simply from not detecting the CD-ROM drive. Using a boot disk I went about creating a 1 GB FAT primary partition, copy the most essential system files, install the drivers for the DTC card, followed by the CD-ROM driver. With that done, it was now ready for installation of Windows.
Upon completion, the drivers for video, sound, and networking were installed. Only the sound card was detected by Windows, though went with Creative’s drivers anyway.
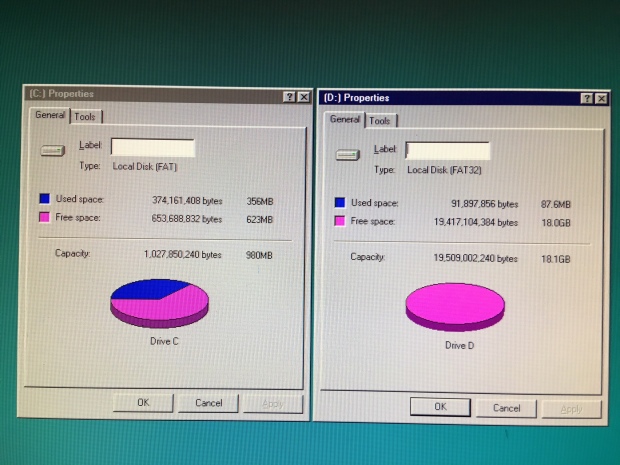
The rest of the hard disk space went to a second partition using FAT32, and will be used to separate all the DOS games from Windows. Should I ever need to reinstall Windows, most things will remain intact.
Overall I’m generally happy with how this 486 PC turned out. There’s a greater sense of accomplishment than with building a modern PC. I don’t get the same buzz from using the likes of DOSBox or PCem, though I can appreciate their existence. Now all that’s left is going through that large archive of DOS games!

Fantastic write-up of your build! Thank you!! I’m about to start collecting the parts for my own, so this article has been really helpful 🙂
LikeLiked by 1 person
I enjoyed your description. Real nostalgia piece for me.
LikeLike
Kind of found this by accident, but I thought it was really cool! Actually made me kind of interested to try something like this myself. Thanks!
LikeLike
Congratulations, you spent all that time and money building an obsolete PC with marginal nostalgia value. At least install Linux and maybe do something useful with it other than consume electricity. After two years you have a system with less computing power than an entry-level smartphone.
LikeLike
Each to their own. “Marginal nostalgia value” is highly subjective. Apart from a historical standpoint, using very early releases of Linux doesn’t hold much value to me. Overall however this is a hobby using my own income, and computing power isn’t the point.
LikeLike
I wouldn’t take anything seriously from a person named HAYWOOD JABLOME, great article and build
LikeLiked by 1 person
In relation to Chinese Ati Rage XL card, I just got one yesterday, plugged it into my Pentium Motherboard (QDI Titanium, one of the later ones I think, it doesn’t use jumpers to configure CPU, it’s done from BIOS) and beeping galore, no graphics card. I didn’t even try it on 486 system after this… But it works fine on my Pentium 2…
Turns out the reason behind this is voltage, although PCI connector is universal type, both 5V and 3.3V. The card actually doesn’t work with 5V only and PCI sockets on 486 and most Pentium boards are 5V only. They don’t provide 3.3V.
They decided to cut costs by few cents and skip on adding 3.3V voltage regulator to lower 5V to 3.3V and instead use 3.3V from PCI slot. And since our vintage motherboards don’t provide 3.3V on PCI slots… it no worky.
But, there is a fix I stumbled upon, so maybe it will help someone else 🙂
LikeLike
Great write-up. Thankyou!
I’m thinking of doing a similar build to play some early 90’s games (XCOM, etc)
I’m in Auckland, NZ and it’s bloody hard to find parts let alone full PC’s of this era now.
LikeLiked by 1 person
Thank you for this post. I really enjoyed reading your about your purchases and then assembly. I guess I am lucky to have three 486’s in my collection. Two are from my own history and one I piked up recently at a surplus shop. I gave one Packard Bell 486 away to a fellow VCF forum member last year.
I love the 486. But I am also learning quite a lot this year on how to set up Windows 95. I didn’t realize how difficult it can be to get Windows 95 to support 32-bit applications with my “new” 486 DX/4-100 VLB system. I found your blog thru the WinWorldpc website while researching software applications that support 32-bit in Windows 95.
Thank you for sharing this blog and I hope you continue it. I am in the Northeast US, in New York state.
LikeLiked by 1 person