 It has been a couple of years since my introductory guide to PCem, which took a look at Version 11. As of now, it’s up to Version 14 with enough changes to warrant a refreshed guide. Some of the numerous improvements since then include supporting Voodoo 2 3D graphics, Iomega ZIP drive, network card emulation, and IDE drives up to 127 GB. PCem also has had a visual makeover so it’s more intuitive to navigate.
Installing PCem
Installation of PCem 14 is really a matter of downloading the distributed ZIP file and extracting the files into an empty folder where you see fit. I personally extracted all the files into a new folder located at D:\PCem, Drive D being a secondary hard disk.
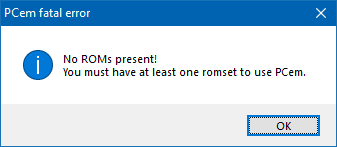 Executing PCem.EXE at this point will bring up only a message that we need ROM files in order to use PCem.
Once some ROM files have been obtained, place each ROM file into the corresponding folder under the roms sub-folder of PCem. For example, I have an AMI 286 BIOS ROM named AMIC206.BIN, placed under D:\PCem\roms\ami286. ROM files for video chipsets can be placed into the root of the roms folder. You will find out quickly enough when later creating a new virtual PC whether you’ve placed the ROM files into the right location. If you cannot find it under the relevant drop-down menu, that’s a good indication it was placed in the wrong spot. The more compatible ROM files you have, opens up more choices for setting up your virtual PCs.
Configuring PCem
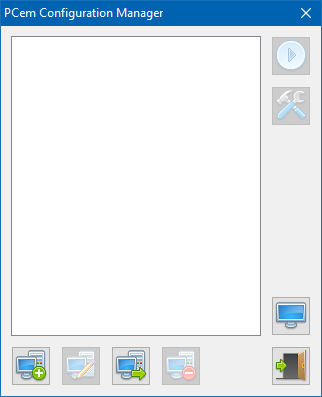 With the ROM files in place, you will be presented with the PCem Configuration Manager replacing the drab grey window from previous versions past. This allows for keeping a number of saved PC configurations and changing between them with ease.
The four buttons towards the bottom left corner are to create a new virtual PC configuration, rename, clone, and delete. Along the right-hand side from the top is to start the virtual PC, set the configuration, host settings for networking, and to close PCem.
Select the New button and you’ll be ask to give your virtual PC configuration a name. A couple of quirks that may get fixed in a later version. Creating a name such as ‘$^%*&^#’ will continue to the configuration dialog box but doesn’t save the configuration. Typing the maximum allowable name using 64 characters causes PCem to crash, whilst 63 characters won’t. With 63 characters however, the PCem Configuration Manager loses the right-hand side buttons unless you restart PCem altogether. Up to around 45 characters and none of this happens.

Once you’ve entered your sensibly short name for your first PC configuration, you’re now given the fun task of setting it up.
Motherboard
The first tab on display is effectively the motherboard tab. Select your machine, for example whether you wish for it to be some old IBM XT or a 486 PC for instance. Based on the machine selected, will determine the available CPUs below it. The first drop down menu for CPU is to select the manufacturer followed by the CPU itself. Standard convention is for the CPU name, followed by the frequency. For example in the below screenshot, the selected CPU is a 286 rated at 6 MHz.
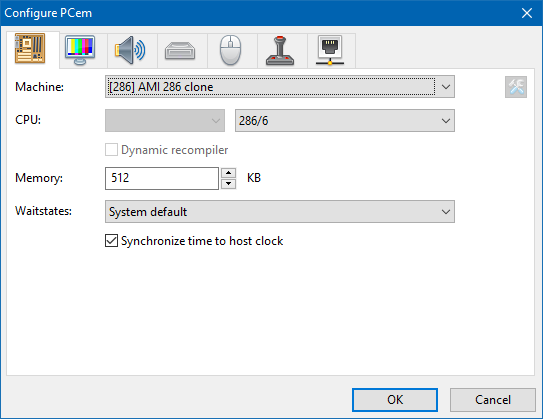
Setting up BIOS, processor, and RAM.
The dynamic recompiler option may not always be available depending on the machine chosen. This is to enable runtime translation of code between platform architectures. One such example is back when Apple had Rosetta in Mac OS X in order for PowerPC applications to operate using Intel Macs during the transition period.
The memory option it to determine the amount of RAM. This dynamically changes with the machine, either offering capacity in kilobytes or megabytes. Using the 286 ROM file for instance, the maximum value here is 16,384 KB.
The waitstates option is to set a wait state for up to seven CPU cycles. This is to force the CPU to temporarily pause until such time further data is available for processing, when potentially another device is slower to respond. For faster machines this option may not be available.
Lastly on this tab, Synchronize time to host clock is for the virtual PC’s clock to match your physical PC, the host.
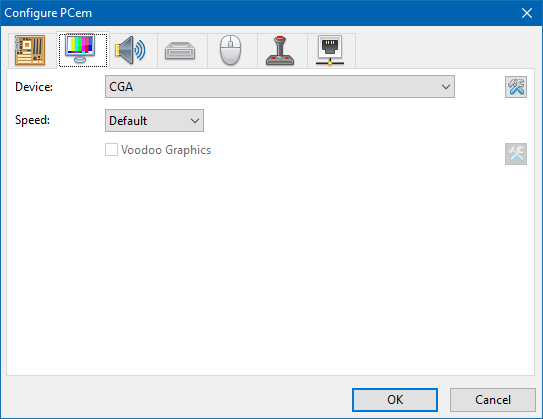
Choosing the video adapter and associated settings.
Video & Display
The second tab is for setting up your video adapter, selected by the device drop-down menu. Any ROM files for video adapters placed into the roms folder earlier on should appear here. To the right there’s a small button representing tools for further configuration, though is dependent on the device chosen. For example having either MDA or CGA chosen will provide the options to have a green, amber, or white phosphor style display, just like the the monitors did way back in the 1980s. I guess it adds to a more authentic experience if you were wanting to run CP/M-86! Choosing a device that was released in the 1990s may only give the option to change the amount of video memory available.
The speed option is to set the bus speed of what originally would have been the ISA, VLB, or PCI slot in a physical PC. If you feel there’s a need you may use it to tweak your configuration, though generally is fine to leave on the default option.
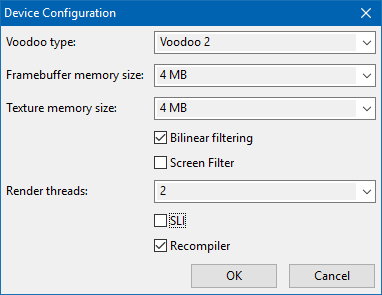 The final option here is to enable Voodoo Graphics. The option will only be enabled depending on the machine selected on the previous tab. If you have selected a Socket 7 Pentium-based machine, then the option should become available. There’s additional settings to select whether to use the original Voodoo or Voodoo 2 and adjust memory size. The option of Voodoo Graphics is handy for those Windows 95/98 games that took advantage of 3dfx’s Glide API.
Sound
The third tab is now for setting up sound output. Under the device drop-down menu, you’ll find a range of mostly Sound Blaster cards to choose from. Similar to choosing the video adapter, the settings available are subject to what had been chosen.
The following three check boxes are also additional devices available. CMS for instance represents Creative Music System, originally a sound card released in 1987 before the time Sound Blasters came about. The Game Blaster was effectively an identical sound card, simply re-branded.
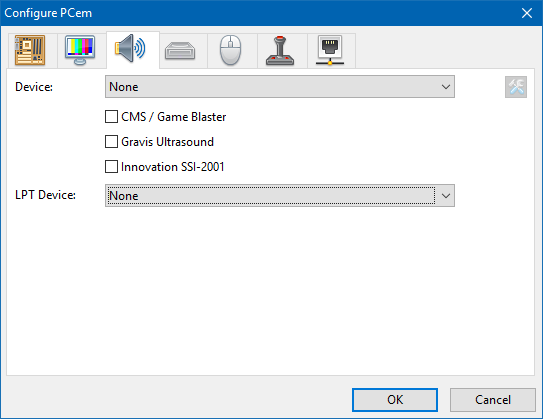
Choosing the sound card.
The final choice is in regards to LPT devices. Devices such as the Disney Sound Source would plug into the back of the PC’s LPT port, that normally had been used for connecting printers. It was originally an affordable alternative to purchasing a dedicated sound card, though sound quality wasn’t comparable.
Storage
Onto the fourth tab is setting up storage devices – hard disk drives and removable media.
For hard disks, you’re presented with three options. The first option, None, as it implies is not to have one at all. This option may be suited if you intend setting up an 8088 PC that would start the operating system from a floppy disk, just like the original IBM PC.
The next option is MFM (Modified Frequency Modulation) as the controller. The technology dates back to the 1970s; hard disks were physically bulky, and usually in the capacity range of 5 to 50 MB, spinning at a lowly rate of 3,600 RPM. Top of the line models, such as the Maxtor XT-2190 peaked at 190 MB by the time the last MFM drives rolled out of production around 1990.
Selecting [MFM] AT Fixed Disk Adapter you are limited to two hard disks, so no CD-ROM access. On the lower half of the Configure PCem dialog box, you may select the yellow open folder button if you have an existing hard disk image file, provided it’s an IMG file.
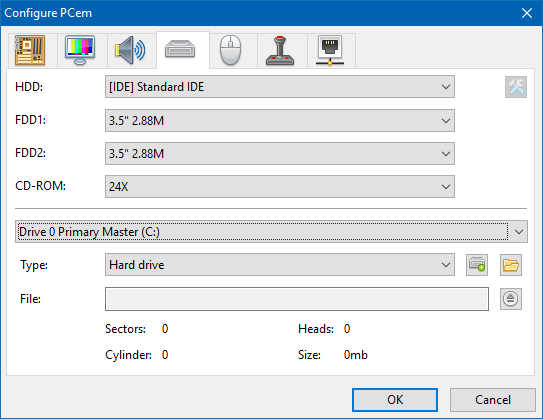
Configuring hard disk and removable storage drives.
Chances are however you’ll want to create a new disk image file, so with Drive 0 Primary (C:) selected, click the new button as below. The New Hard Disc dialog box appears. Select the yellow folder button and from here choose the location and name of the disk image to be created. Next enter the geometry values for this hard disk. The default values provide a capacity of 251 MB. The options available under the Type drop-down menu are more typical of that for an MFM drive. Upon confirmation the disk image has been created, PCem will remind you that this requires to be partitioned and formatted, just like a physical hard disk.
Using MFM is a valid option if you intended to mimic the IBM XT, which originally came with a 10 MB Seagate ST-412 MFM hard disk.
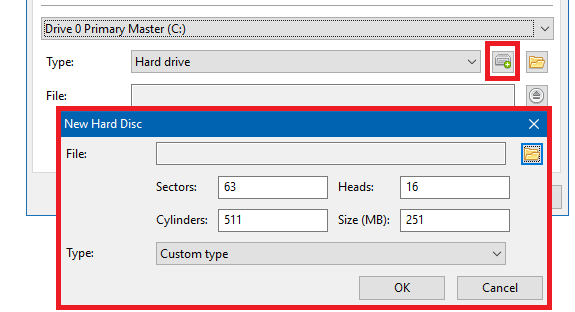
Creating a new hard disk image file.
Alternatively and more appropriate for 286 systems and up is choosing the option [IDE] Standard IDE instead. Up to four drives can be added via a primary and secondary channel, each supporting a drive designated as master and slave. The process to create a disk image with IDE is much the same as with MFM, except to choose Drive 0 Primary

Geometry values for various hard disk sizes.
Master (C:) for the first hard disk. The following table provides geometry values for larger hard disks more appropriate for a Windows 3.x/95 system. Alternatively you may enter the size of the disk directly which will automatically adjust the number of cylinders to suit.
Back to the Configure PCem dialog box, you may select Drive 1 Primary Slave (D:), and under the Type drop-down menu, choose CD-ROM. An additional drop-down menu for CD-ROM can be used to set the simulated speed of the CD-ROM drive. Setting the speed at 1x translates to 150 KiB (kibibytes) per second. Faster speeds simply multiply this.
The remaining options are to select your floppy drive/s. The FDD1 and FDD2 drop-down menus are designated as Drive A and B respectively. Back to the IBM XT example, the 5.25″ 360k option would be appropriate. A 486 or Pentium system would make more sense to use the 3.5″ 1.44M option instead.
Mouse & Joysticks
The fifth tab is a simple affair of selecting either a 2-button or 3-button serial mouse. Not much to see here!
The following tab concerns joysticks from a basic 2-button version up to a Thrustmaster Flight Control System. Depending on the chosen joystick, changes the configuration settings available though these were left blank.
Unlike the old days where the joystick would plug into the back of a sound card, the joystick in PCem is not dependent on a sound card.
Networking
The seventh and final tab is for adding a network card. Only once card is provided, the Novell NE2000, based on the original ISA Ethernet cards. All that can be changed is the address and IRQ settings, which shouldn’t need changing unless conflicting with what was chosen for the sound card.
Menu Options
Since PCem 13 the menus that you see whilst running a virtual PC have had quite a number of changes. Here’s what they entail in summary:
System Menu
- Hard Reset – The equivalent to physically pressing the reset button on your computer, also known as a cold boot as the computer momentarily has no power. When the emulator restarts it checks that the memory is okay.
- Ctrl+Alt+Del – As you possibly guessed, it’s the equivalent to pressing the Control, Alt, and Delete keys simultaneously to restart, known as a warm boot. This skips the memory check on startup.
- Shutdown – As it implies, this shuts down or turns off emulation.
Disc Menu
- Change Drive A/B – Two options to mount floppy disk images (IMG, IMA, and FDI formats). Drives A and B were traditionally reserved for floppy disk drives.
- Eject Drive A/B – Another two options to simply dismount the floppy disk image that was previously mounted.
- Disable BPB checking – Disable checking the BIOS parameter block, relating to the physical properties of a disk volume within the volume boot record (VBR).
- Create blank disc image – Useful for creating blank floppy and Zip disk image files as needed. You’ll be asked what capacity of the disk to create and where to save it. Note only 100 MB Zip disks can be created, not the later 250 and 700 MB versions.
- Load/Eject ZIP drive – Mount and dismount a ZIP disk image file.
CD-ROM Menu
- Load image – Mount a CD-ROM image file (ISO and CUE formats).
- Empty – Quickly dismount a CD-ROM image file.
- Image – Works the same as Load image to me – maybe I’ve missed something with why there’s a second option.
- Host CD/DVD Drive (X:) – Mount a CD or DVD that’s been mounted onto the host PC where X refers to the drive letter, either from physical disc or an ISO mounted via Daemon Tools etc.
Video Menu
- Resolution – Resize or set the screen resolution of the PCem program window. The actual resolution output of what is being emulated still relies on the operating system and chosen video adapter.
- Remember size and position – Retain the current PCem program window size and position after closing PCem.
- Toggle fullscreen – Use your virtual PC in full screen mode.
- Fullscreen on input grab – When on, PCem will switch to full screen mode when clicking over the video output. Basically to avoid manually selecting the Toggle fullscreen menu option or pressing Ctrl+Alt+Page Down to switch to full screen.
- Fullscreen mode – Choose between borderless and exclusive modes. Borderless mode allows PCem’s window to behave as normal despite using the entire screen, whilst exclusive mode attempts to ignore Windows’ window management.
- Render driver – Select Direct 3D, OpenGL, or software rendering. Alternatively let PCem decide.
- VSync – Meaning Vertical Sync, when enabled aims to synchronise your frames per second with your monitor refresh rate.
- Dim display on lost focus – When activated, PCem’s video output will appear dim when the PCem program window is not active.
- Alternative update-lock –
- Scale filtering – Select either nearest or linear filtering. If you work with graphics, think high pass and low pass filtering respectively.
- Output stretch-mode – Adjust output to utilise 4:3 aspect ratio, or force squared pixels.
- Output scale – Need to select Original from the Resolution menu to enable this. Scale up or down the magnification.
- OpenGL 3.0 renderer – Need to select OpenGL 3.0 from the Render driver menu to enable this. Apart from having its own filtering and stretch-mode options, shaders can also be managed here.
Sound Menu
- Buffer length –Adjust the amount of time for sound processing, from 50 up to 400 milliseconds.
- Output level – Adjust the volume output level up to +18 dB.
Misc Menu
- Screenshot – Take a screenshot from PCem and save in PNG, TIF, BMP, and JPG formats.
- Machine – Provides various details on your virtual PC as it’s running, such as effective clock speed, video throughput, frames per second for rendering, and speed history.
Virtual PC Examples
With the right ROM files a number of options exist to create all sorts of computer systems. Below are a couple of examples:
Example #1 – IBM PC/XT
Using the IBM XT ROM, the following configuration aligned closely to that of the original IBM PC. An 8088 4.77 MHz processor, 128 KB RAM, CGA monitor and a single floppy drive.

IBM’s PC DOS 1.0 was booted and I ran a couple of programs written in BASIC. With no sound card, the PC speaker emulation comes into play.


Example #2 – 386 PC
Using the AMI 386 ROM, the following configuration could be typical of a 386 PC, back when it was referred to as an IBM PC compatible. Here I’ve gone for an AMD 386 DX 40 MHz processor, 8 MB RAM, a 1 MB Trident TVGA8900D video card, SoundBlaster 1.5 sound card, a 350 MB IDE hard disk, and a couple of floppy drives.

MS-DOS 6.0 and an IBM OEM copy of Windows 3.1 was installed. Choosing the Sound Blaster 1.5 allows for easy setup on Windows 3.1, as a basic driver is included. The old DOS game, Duke Nukem 3, played without a hitch.


Whilst running your virtual PC, note the percentage shown on the title bar. Ideally this needs to sit at 100% to emulate the chosen PC configuration at a more authentic experience.
PCem has really come a long way since it’s initial inception. It would be nice if a “Macem” version existed to handle 68k and PowerPC Macintosh, but that’s wishful thinking!

Hi there. I see your table of HDD sizes, however, PCem screams at you if you put anything higher than 16 at heads, or 63 at sectors, so what’s the deal…?
LikeLiked by 1 person
Thanks Walter for bringing this up. The deal is I made an error without testing each capacity in the table. As PCem still calculated total disk size with more than 16 heads, I speculated it accepts values not seen on physical hard disks. The table has since been updated.
With creating the virtual hard disk, PCem is aligned with the ATA/IDE specification where the maximum supported drive is 65,536 cylinders, 16 heads, and 255 sectors per track for a total of 137 GB.
It’s a limitation of this specification in conjunction with physical characteristics of the hard disk, and is used to tell the computer’s BIOS how and where to store data across the hard disk’s physical platters.
LikeLike
I’d love a Macem too!
LikeLike
Macem :)…Just compile PCem on MacOS: https://github.com/PCemOnMac/PCemV17macOS
Have fun!
LikeLike